First and foremost here’s to a happy and healthy New Year for all!
I’m very pleased that my step-by-step guide to painting Dark Eldar Scourge Wings has proven to be fairly popular. It’s even been picked out by Roman from Massive Voodoo for inclusion in his latest list of inspirational links! As an addition to the step-by-step I’d like to present an illustrated guide to stippling. It’s something I get asked about on a fairly regular basis so I guess there needs to be a bit of explaining done and it’s easier to show rather than just tell.
It’s worth pointing out that how I use the term stippling with regards to mini painting is very much my own personal definition of a painting technique and I’m not laying claim to the invention of something new and previously undiscovered.
Stippling is a term I was familiar with from painting and illustration and it is from this that I drew my initial inspiration. One method of shading a black and white illustration is to apply small dots of black. You can adjust depth of shading by varying the density and distribution of the dots.
You can work in a similar way with paint and here the dots can be used to create changes in both colour and shading. The most famous example of this can be seen in pointillist technique used by artists such as Andre Derain and Georges Seurat.
For the purposes of this guide stippling is a mini painting technique where you apply tiny dots of colour using the very tip of a fine brush. Varying the density and colour of the dots can create a shading/highlighting effect. The stippling action can be performed quite quickly but I’d advise a slow careful start - speed will come with practice. This technique is very controllable and can be used to make precise adjustments to an area’s colour/shading. It can be used on its own to highlight/shade an area or in conjunction with other painting techniques.
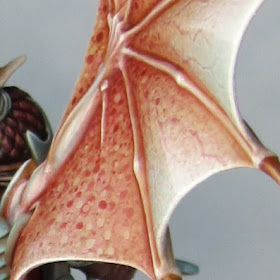
Stippling is also extremely variable. Working with very fine dots and subtle changes of colour/shade will give subtle graduation with a less visible dot texture. Alternatively you could push the dots to the max for a dramatic and spotty effect like the one I’ve used on the back of the Scourge’s wings. Both paints and washes can be used and their differing qualities will affect the final result.
When I first use stippling I mostly applied it to Eldar armor. Here I have used a relatively subtle (OK its bright pink but I’m not referring to the colour!) variation in texture and tone to give a smooth transition from highlight to shade with a light speckled texture. When I refer to texture in regards to stippling this is a painted effect as the actual surface is smooth.
This painted ‘texture’ is one of my favorite things about stippling. It is particularly affective when used alongside areas of more conventional blending. In my opinion stippling is a particularly good affect for use on large areas of flesh as it can give mottled/speckled look and flesh is very rarely all of a smooth even tone. The subtly of the affect can be varied to keep things looking relatively naturalistic.
On the Unicorn above stippling has been used to highlight and give a dappled texture. Colour has been used very simply working up from a blue grey base to white highlights in an almost monochrome style.
The Nurgle predator above also used stippling to give a fleshy quality to it’s surface. As well as providing highlighting and shading the stippling helps to give a more interesting quality to the flesh by using a combination of greens and ochres. The coloured dots are distinct but the eye blends them together when viewed at even a slight distance.
Here on the inside of the Scourge’s wings stippling is built up to create a textured area of shading between the fingers. I’ve used a combination of red & brown washes for the stippling and kept the dots very fine. Where necessary I’ve gone back over and stippled with the lighter base colour to adjust the tone.
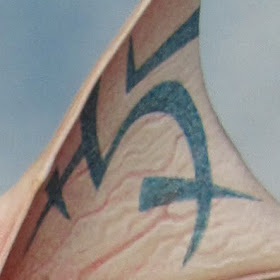
The tattoos were filled in with a stippled texture to keep the look of then consistent with the wings.
On the back of the wings some of the dots are applied using a cocktail stick so that the stippling gives the impression of a spotted skin pattern. Check out the ever-excellent Massive Voodoo For Roman’s
Tutorial -Making skin with dot grain.
You can also see how washes have been used with the stippling to help blend the effect in with the overall look of the mini.
Also on the back of the wings you can see how stippling has been used to build up both highlights and shading. At the same time it provides an overall grainy texture and a spotted skin pattern. Again the careful application of washes in a glaze helps to bring everything together.
I hope this guide proves useful. I’ve deliberately avoided trying to produce a step-by-step to stippling, as, for me, the process is one of constant improvisation and adjustment as I’ve said before I make it up as I go along. Although it can sometimes result in tears the best way to learn is to take a deep breath and just give it a go.
Nothing ventured - nothing gained!


