Life goes on! So it’s time to catch up with my blog posting again!
The week running up to the Iron Skull Painting competition saw a frenzy of basing activity, partly due to the impending deadline; but mostly due to a burst of energy and enthusiasm. It felt very good to lose myself in my hobby for a few days and even better to see that result is substantial progress.
I usually find painting a base to be a quicker, less intense, sort of painting but the base for this project was not insubstantial and it incorporated a face, albeit a stone face. To get things started I decided to use Zenithal priming. That’s not something I’m overly fond of as I think it’s a rather imprecise way of representing the fall of light on a subject. But in this case it was a great way of quickly establishing the initial placement of highlight and shade areas. Before I did that, however, I took reference photos for the intended lighting and these were enormously helpful in achieving the subtlety and nuance that the priming lacked.
I often use photos for lighting reference and it’s something I recommend in my workshops. I think reference photos should always be used for guidance rather than something you must slavishly copy. The big difference they have made to my painting is that the placement of highlights and shadows on my models is now a matter of informed choice.
 |
| I said ‘frenzy’ earlier and so it was because I completed all the painting for the stone in a single day after nine hours of solid painting! |
It’s important to remember that all the colours on a base should be considered as a part of an overall colour scheme. My Troggoth and the Goblin both feature a dominant warm red/brown with cooler green/grey shades to contrast and complement. Those same green/grey shades are the dominant colour on my base. However I have still used the same dark brown as a global shade colour on the base as I used on the Troggoth.
 |
| These are the colours I used to create the green/grey tone for my rocks. |
I’m not going into much detail about how I added the plants to my base because most of it was covered in my earlier post: ‘Adding plant effects to a model. Or, the grass is always greener on the other side of the Troggoth!’
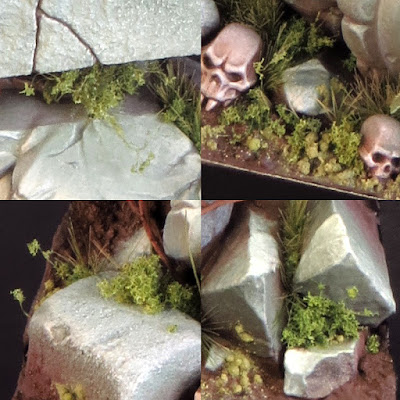
However I will stress that the plants should work within the overall colour palette and contribute to texture contrast, so be mindful when you pick which grass tufts to use! Something I tried out for the first time was clump foliage. It’s a mixture of ground up foam particles and fine fibers and it worked wonders for the overall look of my plants. I found mine in a model railway shop where there was a wide range of colours and sizes.
 |
| A few examples of the clump foliage on my base. |
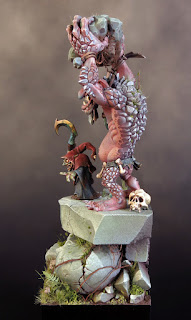
The final step was to fix the models to the base and this is where special care should be taken. I’d planned well ahead for this so I was ready when the time came. It’s vital that your models look like they are properly situated in the environment you are creating. They should make proper and appropriate contact with the surface they are standing on. They should also affect and be affected by their immediate environment, for example putting dirt on a model’s feet and footprints on the ground.
The big challenge for this project was to make sure that both models were in full contact with the base. Both the Troggoth and the Goblin have perfectly flat surfaces underneath where they contact their bases. Because I’d decided not to have any plants on the upper surface of the rock base there would be no way of hiding any gaps. This is the reason I mounted the models onto a flat slab of stone. But the surface texture of that stone created a few gaps between the models and the ground surface!
My solution was to fill these gaps with dilute PVA woodworking glue. Surface tension drew this mix into the gaps. Over the course of several applications the gaps were filled and camouflaged. Dilute PVA is great for filling fine gaps on painted models but it’s very important to allow each application to dry thoroughly before applying the next due to shrinkage.
Basing models is something I really enjoy. It can be tricky and has the potential to go wrong. But if you plan ahead and take a little care it can be the finishing touch that brings that something extra to a model.


