Skulls, Nurglings, Tentacles and a spot of bother with my microbeads!
Since I started painting my Daemon Engine at the beginning of February, I’ve made very good progress because I’ve managed to paint for a few hours almost every day. In fact, at times, I’ve almost gotten ahead of myself. I went into the painting stage of this project with a plan, of course, but I had many different options. That’s because I’ve spent years thinking about this project so I have a lot of ideas for how I could paint it. Far more ideas than I can (or should) incorporate into one scheme!
So part of the challenge I face is to sort through all the ideas I have and edit them down to those I’m going to implement. I have to make just as many choices about what I’m not going to do as to what I am going to do. This is where my notebook and a file of reference/inspirational images have come to the rescue. They help me to keep track of my changing ideas and make sure I don’t forget any of them when the time comes to make a decision. This is an ongoing process because the more I paint the more resolved my ideas become but they can also develop in directions I’d not anticipated.
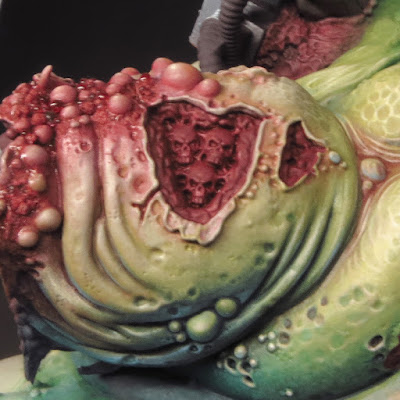
Every now and then I need to pause, sit back and consider my work. Which is just what I hadn’t been doing so it should come as no surprise that I found myself working on a part of the model for which I had no firm plan. The back of the left arm featured the sculpted detail of three skulls, forming a Nurgle icon, set into a large open wound. Very gruesome and apparently straightforward, all I had to do was paint what was in front of me.
However, I had a nagging feeling that I needed to do something with this area other than just paint it as it is! The skulls are a great detail in their own right but were too distinctive a detail from the donor model (Great Unclean One) and in the new context seemed a little fiddly. Whenever I’ve had doubts or problems with this model I find the best solution is nearly always to be bold, so I decided to replace the skulls with something a bit more dynamic!
I chose to have a Nurgling popping out of the wound. I painted my Nurgling, stuck him in place and filled the surrounding wound with microbeads. As it turns out this was not a good choice because I had replaced one fiddly detail with another. In addition to that the microbeads looked very artificial. It was time to follow my own advice and be bolder!
I scraped away the microbeads and prised the Nurgling off the model. Then I took my Dremel and ground away all the detail of the wound to make a deeper recess. This was nerve-wracking work, and it made a horrible mess, covering the area in tiny plastic flecks that were very difficult to clean off the painted surfaces. But no pain no gain!
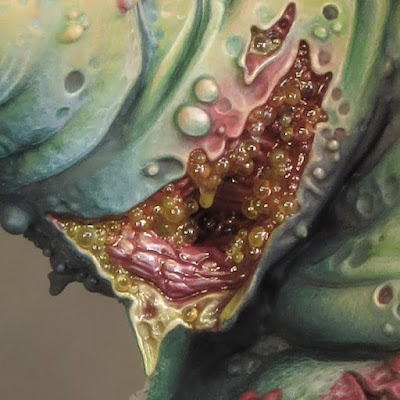
I decided to see how the model looked with a tentacle hanging out of the wound. This was a much bolder element than the skulls or Nurglings and it also tied in to the other tentacles on the model. A quick test fitting confirmed that this was a move in the right direction but I decided to add two tentacles because that was a little more dynamic than just one. I pre-painted and varnished the tentacles before I pinned and glued them into place. Next I had to deal with the wound and microbeads.
I’ve covered the use of microbeads on this blog before and you can find my tutorial HERE. However as time has passed I’ve gained more experience with my technique and materials.
I still recommend applying the microbeads one at a time as this gives far more control over the final look. If you fill or cover an area with a mass of microbeads in one go the finished result can be formless and bland. Taking care with their placement will enable you to ‘sculpt’ with the microbeads and create some form and structure to your effect.
In my experience water effects is the best medium to fix your microbeads in place and bind them together; but it can also be mixed with a range of differing materials to tint it. Of course quantities used can be varied to adjust the finish but the examples bellow show my favourites.
Water effects finished with a coat of gloss varnish will give a crystal clear finish.
To varnish or not is a big question because it can radically alter the final result of any water effects. I use Vallejo Still Water which dries to a clear shiny finish but that may change over time. I’ve noticed that over the course of a few days the finish will become a little duller and eventually take on a matt/frosted look. This may be a result of my products being out of date but it has eventually happened in all cases where I’ve not varnished over my water effects!
However all is not lost because I quite like the frosted/translucent look. It’s an interesting and useful variation on the effect and the frosting doesn’t occur if the water effects have been varnished once they are dried. Where the frosting occurred and was unwanted it was easy enough to fix. I think the frosting is caused by humidity so I take a hairdryer and apply a gentle stream of warm air to the model. The frosting will disappear and the clear gloss finish will return before your eyes - like magic! It is then possible to apply a couple of coats of gloss varnish for a permanent fix. My preferred varnish for high gloss effects is Tamiya clear X-22.
The final update to my use of microbeads and water effects came as a direct result of how they looked on my Daemon Engine. I’ve always intended to feature a quantity of slime and goo on my new model, as it was a prominent feature of the old one. I felt that the semi-opaque look and more muted colour I get from using pigment powders was the way to go because I didn’t want my slime to be too bright and ‘cartoony’. But as soon as I started adding water effects and microbeads to this model it looked very artificial and didn’t feel like a part of the whole.
The solution was to apply some subtle red glazes over the green slime once it was dry. I usually build up a stronger red in deeper areas and along the top edges of my slime. This has the effect of toning down the slime and blending it into the surrounding areas. Even when it has been glossed over the slime now feels like a part of the whole scheme.


