Showing posts with label conversion. Show all posts

Friday, 9 August 2024

Aeldari Voidscarred Corsairs. Part 1.

Picking a new project.


I decided on my current mini painting project quite some time ago. The release of the ‘new’ Aeldari models had me hooked from the moment I saw them; and lets be honest, when it comes to Warhammer, if I’m not painting Nurgle it will probably be Elves of some kind! So, it was an easy choice when I got myself a box of Voidscarred Corsairs back in July 2022.

Over the years I’ve painted many types of Eldar or Aeldari, as they are now known. Back in the ‘90’s I painted Guardians, Aspect Warriors, a Harlequin and an Incubi. In more recent times I’ve turned my hand to a Farseer, Drukhari Scourges and a Haemonculus. But I’ve never painted any Corsairs and, now that I think about it, that feels like a big omission! 


Corsairs have been around for a very long time but it wasn’t until the release of the Voidscarred Corsairs that I felt inspired to paint any. The models in this Kill Team have a tremendous amount of variation and feel like a group of distinct individuals. That’s exactly what I need if I am to have any chance of painting a unit. Only time will tell how many models from the box I paint but I’m confident that I will paint more than one!

Corsairs can come from any of the Aeldari or Drukhari factions and this is reflected in the design of the miniatures. That’s something I particularly like about these models and, together with the background information, it began to give me some ideas for a paint scheme. Back when I was first painting ‘Eldar’, I had a very black and white view of them as good Eldar and bad Dark Eldar. I don’t think that was ever really the case and, over time, I’ve developed a more nuanced view of them with human notions of good and bad not really being applicable to the ‘alien’ Aeldari. Some of the newer models also seem to reflect a blurring of the boundaries between the different factions. This blend of design elements has created a striking aesthetic for the Corsairs.

Finding inspiration


The independent and adventurous nature of Corsairs suggested that I shouldn’t be too bound to the idea of creating a uniform paint scheme. Rather the unit should have a shared palette and iconography that allows for a lot of individuality. That, together with the individuality of the sculpts, should provide plenty of creative opportunities.

Amidst the background information for the Aeldari Corsairs, certain words began to jump out at me: wild, unrestrained, garishness and ostentation, for example. These characteristics fired up my imagination and I decided to go ‘Full Pirate’ in my treatment of them. After a moment of reflection, I decided that peg-legs, hook-hands, eye patches and parrots might be too ‘on the nose’, but only by a little. The models would require some modification to achieve my full vision.

Thinking time is just as important as painting time. I especially enjoy the early stages of a project where anything I can think of is a possibility. As my ideas for an overall approach to the Corsair model developed, I began to consider a colour palette. I decided upon was a dark and sinister blue/green contrasted with saturated red/oranges and purples. That’s a colour scheme very much to my taste with strong light/dark and warm/cool contrasts. 


However, I began to go off this idea. It felt a little obvious and very similar to other schemes I’d done, most especially to my Farseer. I was making the mistake of sticking to my comfort zone and, as a result, the scheme I planned didn’t really excite me.

It was at this point that ‘taking my time’ really began to pay off. Once I’d rejected my initial plans, I indulged in a little leisurely research by reading up on Aldari Corsairs and searching through images of both artwork and painted models.

There was plenty to be inspired by. But when I came across some old John Blanche illustrations of Eldar and Eldar Corsairs, they fully grabbed my attention. I knew these images from years back but I’d forgotten them. John Blanche’s artwork is in the very DNA of Warhammer and its influence can’t be overestimated! I first found John’s work in the pages of the 1979 Tolkien Bestiary, long before I was aware of Citadel miniatures or Games Workshop. However, John’s artwork is not something I’ve been consciously inspired by in my own mini painting … until now that is.

Seeing John’s Eldar illustrations afresh gave me quite a jolt because here were some of the very qualities I wanted to put into my models. John’s Eldar had a baroque, barbaric look that triggered my interest and imagination. Not for a moment am I pretending that I will take a ‘Blanchitsu’ approach to my painting but rather John’s illustrations have provided inspiration and a starting point for my ideas.

The style of the illustrations reinforced my resolve to modify the models but it was in the choice of a colour palette that they provided the greatest inspiration. I began to experiment with a warm palette featuring red, dark brown, black, white and greenish yellows. This is a very different sort of palette for me and I spent some time playing with these colours in my notebook. I wasn’t 100% there but my ideas were coming together! 


Building a ‘better’ pirate.


The model that most troubled me was the Felarch. When I first looked at the Corsairs I wasn’t at all sure what to do with this model. There is nothing wrong with the Felarch that comes in the box, but it lacked the over-the-top ostentation I wanted for my Corsairs.

I didn’t have to look too far for replacement parts. The Visarch, Champion of Ynnead is a model I had in my collection and I’d noted that his armour is a good match with the new Corsairs. It’s styling is more baroque and that’s exactly what I needed! I began to see how I could use him as a donor for multiple parts.

I said earlier that I’d rejected full-on pirate trappings like parrots and peg legs, but those thoughts wouldn’t go away. I combed through Games Workshop’s range for a parrot equivalent. There were several possibilities but the one that really caught my interest was the Wyvach familiar that comes with Kyria Draxus.

Kyria Draxus is a beautiful model in her own right but I thought the Wyvach would be a perfect pet for my Felarch. The Kyria model has this creature perched on her outstretched arm, which is wearing a power fist. I can remember when the Eldar models first came out and many of those early models had power fists. The power fist on Kyria is comparatively lighter, more delicate, than those worn by Space Marines. As such I didn’t think it would look too out of proportion on an Aeldari model. So I decided to use the entire arm - power fist, Wyvach and all. I also removed the skull pauldron from Kyria’s other arm to use on my Felarch. These additions certainly bring the desired garishness and ostentation but they also add a barbaric touch that works well for my Blanche-inspired vision of the Corsairs.

Putting all these parts together into one cohesive model was fiddly work, so I proceeded with due care. I started by assembling the Felarch’s Torso and cloak from the Corsairs set. To this I attached the legs from the Visarch. I had to do a little carving to enable them to fit at the angle I wanted and then pinned the parts together for strength. This left a fairly large gap that had to be filled and sculpted over with greenstuff. I decided to leave the power fist and Wyvach unattached to make painting easier. But these parts are a crucial element of the overall pose so I prepared them as a sub-assembly that could be attached on a temporary basis. The left arm also came from the Visarch and could be attached with minimal trimming.

I’d decided to use the Visarch’s helmet, which is very similar to the helmet option for the Felarch, but more elaborate. I removed the spike from its crest and replaced that with the plume from the Felarch’s helmet. Rather than simply putting the Visarch’s helmet onto the Felarch’s torso, I also used a portion of the Visarch’s neck and collar, which brought another ostentatious element to this character.

The final piece to add was the skull pauldron. This comes in two halves so I had to assemble the Kyria Draxus torso first and then cut the skull from it. To my surprise this came away cleanly and only needed minimal trimming to make it fit the Felarch’s torso. 


I took my time customizing the new Felarch. Details like the relative angles of the head and limbs make a massive impact on the overall pose of the model and I wanted to get this right. I can remember all too well how many times I had to tweak my Tomb King before I was happy with his pose!

Originally I hadn’t intended more than a head and arm swap but I’m delighted with how my new Felarch came together. I now felt that I had a striking and unique model that would be enjoyable to paint!


Thursday, 9 January 2020

Rockgut Troggoth – Part 7. The Troggoth is done so it's time to start my Goblin.

This is the time of the year when I often think about endings and beginnings which, as it happens, is not an inappropriate attitude for my Troggoth project. I’d wanted to finish the Troggoth before Christmas and, having established a productive painting routine, I was able to achieve my goal!

Most of the work was involved in painting the second hand and this went more quickly, if not more easily, than the first. Having established my approach the first time around it was a matter of making the hands match, but with just a little variation so as to look more natural.


After the hands there were a number of small details to finish. Most these were rocks and leather straps and I had to force myself to slow down and paint them carefully. As a model nears completion I feel a strong urge to hurry up and get the job done. It’s important to resist this urge as it’s all too easy to spoil good work. This is also the time to take a good long look at the model as a whole and decide if any of the earlier work needs to be adjusted in the context of the overall scheme.


In the case of my Troggoth I decided to change the colour of a couple of the stone amulets he is wearing. I wanted to use just a little more green on the model to contrast with the overall red/brown warm tone. In addition to that the extra green, along with the moss and grass on his back, will tie the model in with the environment I’m setting him in.

With the Troggoth done I’ve turned my attention to the Goblin. I’d been unable to find a miniature in the exact pose I wanted! To be honest I hadn’t really expected to so I’d settled on the notion of converting a miniature. This would help me to tell the story I was creating. After searching through the range of Games Workshop’s Goblins I decided upon Zarbag from Zarbag’s Gitz. His pose had the potential to be converted with the minimum of fuss into what I wanted. The crucial change was to swap the hand carrying the lantern for one pointing.

I’d decided upon what hand to use as soon as I had the idea to have my Goblin pointing. I was already familiar with the pointing hand on the Poxbringer, Herald of Nurgle and this seemed perfect. Or so I thought until the hand turned out to be much larger than the one it was replacing. There was also the matter of it only having three fingers as opposed to the four on the Goblin’s hand.

My solution involved reducing the size of the hand with a lot of cutting and scraping, and swapping the hand holding the weapon for the other hand from the Poxbringer. Fiddly work for sure but it’s always worth the effort.


I’d also decided to remove the cauldron hanging on Zarbag’s weapon. This was an unnecessary detail for my concept and it’s removal allowed me to have Zarbag raising his weapon off the ground in a more active pose that felt more appropriate for his new context.


I don’t often base coat all my colours as a first stage but, as the model is so small, I decided to do so this time. This seemed the most straightforward way to go about things and it also helped me to visualize my overall colour composition. With the base colours down I can set about working the separate areas up to a finished state. I don’t anticipate this model taking me all that much time to paint, although experience adds a note of caution to that statement. The Goblin consists of four main colour blocks: the flesh, the hood, the robes and the weapon. I will paint the Goblin using colours from the same palette as the Troggoth to tie the models together!

Sunday, 11 August 2019

Project P30 Building a ‘better’ tank - Part 4.

It isn’t easy being green!


July was a strange month with life in general being busier than it’s been for a long time. On top of all that the hot weather was not conducive to long hours of intensive sculpting. That might lead you to expect a declaration (or confession) that not much has happened with my tank but I’ve actually made slow steady progress.


The stop start nature of recent work has not been much of a problem because, when working with Greenstuff, I like to proceed in stages allowing each application to harden before I add another. I’ve found that sculpting a large mass can result in a squishy mess that resists my attempts to sculpt distinct forms and volumes. Greenstuff seems to work best when used in moderation over a firm foundation.

I’ve found it important to understand that Greenstuff changes in nature as it cures. When first mixed it’s very soft and sticky but over time it becomes firmer and less sticky. This means that, although hard to sculpt, when first mixed it will adhere to a surface very well. It is also soft enough to blend edges with the surface it has been stuck to. However, in order to sculpt Greenstuff with any sort of defenition, it has to begin the curing process. As the Greenstuff becomes firmer it becomes easier to create crisp forms and details.

Put simply using Greenstuff successfully is all about timing! Understanding that you can do different things with it at different stages of curing is vital. Otherwise you might as well try and sculpt with chewing gum!

I’m forever blowing bubbles!


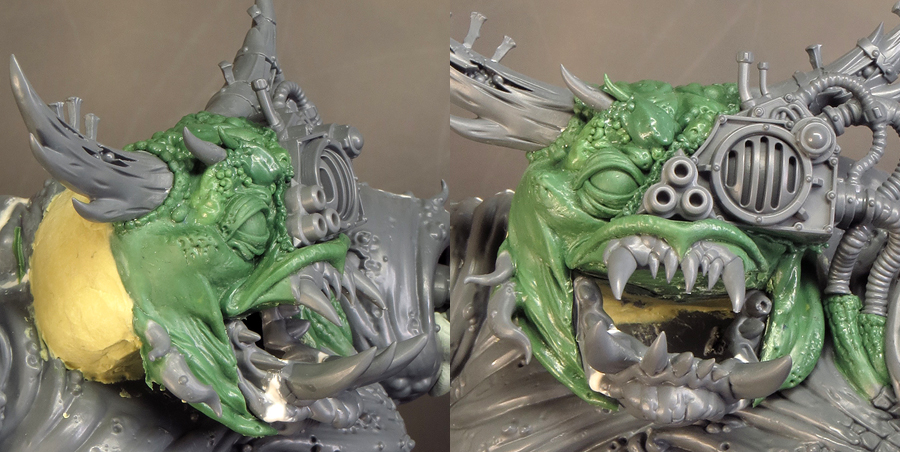
With the teeth and cannon painted, and in place, I needed to sculpt the edges of the belly maw. I decided some time ago not to sculpt lips, and make a literal mouth, but rather to sculpt a ragged mutated wound in which the belly maw had formed. This seemed to be more in keeping with the asthetic of the current GW Nurgle range and appropriate to the model I was creating.
I wanted to create a blistered, bubbly texture and use this as a boundary between different areas on my Demon Engine and, most especially, on the edges of the belly maw. The bubbly texture is also partly inspired by the texture of microbeads and that seemed most appropriate for a Nurgle model of my own creation!

Creating the bubbles is a fairly straightforward two-stage process. First of all I roll out lots of balls of Greenstuff. It’s important to vary the sizes in order to give the bubbly texture an organic look. Then, while the greenstuff is still sticky, I place the balls into position and then leave them to harden. It’s easier to do control the overall look if you do this in several stages, allowing each stage to firm up before you apply the next.


Once the balls are fully hardened I push soft Greenstuff between them to fill the gaps and create a unified surface. Then I use a silicone tipped sculpting tool to work the greenstuff further into the gaps and smooth everything together. This last step is carried out as the Greenstuff becomes a little firmer and less sticky. Filling the gaps, to a greater or lesser degree, will create a more varied and interesting texture.


Over my shoulder


With the belly maw done I turned to the left shoulder and here I wanted to add a shoulder guard. This was built from a section of a plastic shot glass covered with a layer of soft and sticky Greenstuff. I sculpted the shoulder armour using a metal ball ended tool when the Greenstuff began to firm up. To stop my sculpting tools sticking I use a little water. Once the Greenstuff was set I cleaned up the edges with some wet sandpaper and fixed the armour piece into place using a blob of greenstuff. I then built up the shoulder to fill any unwanted gaps between it and the armour.


Crazy arms


The Daemon Engine is starting to come together and now looks more cohesive and complete. The only major parts left are the left arm and the chimneys growing out of it’s back. After a little consideration I decided to tackle the arm next so I have glued the mecha arm into place and begun work on the transition between the organic and mecha parts. Once again I’m using the bubbly texture and will combine this with lose tatters of hanging flesh.


My final pic for this post is just a quick snap but I know quite a few of you are curious to see my old and new Demon engines together: 30 years do make for quite a difference!


Tuesday, 18 June 2019

Project P30 Building a ‘better’ tank - Part 2.


When I last posted about my Demon Tank the project was running in the background alongside preparations for Golden Demon and my Troggoth workshop. I’d already sculpted a head and begun construction on the core of the tank. My efforts were then focused on the Tank elements as I’d reached the stage where I needed to start adapting them to fit my concept.

The Plagueburst Crawler features a heavy dozer blade but I’d decided not to include this. Without the blade the front of the tank has a rounded ‘bellied’ front, which was perfect for my project, as it would blend with the belly of the Great Unclean One that I was using. I had some major plans for the belly but first I had to remove the fixings for the dozer blade on the front of the tank. This was a fairly simple matter of removing two supporting struts but the side panels required a little more finesse.


The supporting struts are moulded onto the side panels and are recessed on the back. The first thing I did was to fill these recesses with milliput. Once that had fully set, I carved the struts away with a Dremmel tool. This exposed the milliput and all I had to do then was make sure the new surface of the side panel was smooth and even.

With the dozer blade removed, I thought I could begin to tackle the union of the tank and the Great Unclean One. But while I’d been working on the side panels I’d had the time to reconsider the work I’d done on the head. I was pleased with my sculpting overall but I felt that the head and face were lacking animation! The entire head sat on the body in a four-square manner much like my original Tank. In this respect I’d made my new Demon far too similar to the old one. From the very start of this project I’ve been certain that I needed to create a more dynamic model and composition than my 1990 original.


The solution was simple enough but required a little nerve. I prized the head off the body and repositioned it. By bringing the entire head forward and angling it round I’ve added a bit of a twist to the pose. This is a far more satisfying composition and helps to bring some life to my Demon. In addition I cut away the entire lower jaw and replaced it with one from a Mangler Squig. The new lower jaw is far more aggressive and the open mouth thus created made a much less passive face. I’m now far happier with how the head and face look and contribute to the overall composition of the Tank.

So finally I could turn my attention to how the Tank had been warped into the body of the Demon possessing it. That meant it was time for a big decision! A key feature of my old model is the gun and how it comes out of the Demon’s mouth. I definitely didn’t want to reproduce the exact same thing on my new model but I did want to pay homage to it. Many newer Nurgle models feature a gaping maw in their belly and this seemed to be the perfect solution. If I could create a gaping maw in my Demon’s belly I could place the plagueburst mortar right inside it.

This was going to involve some serious surgery to my kits and the prospect was a little daunting. If I got things wrong I would probably have to buy a new tank and start over again. I was also unsure as to how I could create the maw itself. I wanted teeth but it seemed unlikely I would find a kit with a mouth big enough to do the job. Such proved to be the case as my first attempt, using the Mangler Squig I later used in the face, failed. Then I spotted Ravenak’s Gnashing Jaws from the Malign Sorcery boxed set and this definitely had potential.


So with a little wrangling (and ebay) I got my hands on the parts I wanted. Now came the bit that required nerve, as I had to cut away the entire front of the Tank with my Dremmel. This went far more easily than I expected and I was finally able to test fit the jaws. It was another nervous moment as I was going by instinct alone. My guess that the jaws would fit well into the space proved correct. What I hadn’t anticipated was just how well they would fit because the curvature of the lower jaw fitted perfectly to the curvature of the Tank’s front. It was with great relief that I realized my plans were working!


To fix the jaws in permanently I had to separate the upper and lower jaws and remove a lot of excess plastic. I did this slowly, a bit at a time, and with lots of test fittings to ensure I didn’t remove too much. This ensured a nice tight fit and made it possible to glue the jaws directly to the Tank. Once the glue was set I used milliput to reinforce the join and fill the gaps.

I was now able to test fit all the major elements of my new Tank and, for the first time, see them all together. The assembly is very rough, involving a lot of Blu Tack, but I can finally see my concept for the overall composition. While there is clearly a lot of sculpting needed to properly tie everything together this feels like a big step forward. Up until now this model has existed only in my head but now I can see how everything sits together and focus my efforts on successfully unifying the elements. The assembly is going to be a long job but at least it’s no longer theoretical.


One thing I didn’t anticipate was the need to paint sub assemblies but I’ve decided that this is the only way to deal with the inside of the mouth and the plagueburst mortar. So I’ve broken out the paints and got to grips with the mortar. Once that’s done I can work on the union of the Great Unclean One, the Tank and the gaping belly maw. It’s going to be quite a challenge to sculpt this area but one I’m excited to take on because it’s going to make a huge difference to the look of this model.


Thursday, 27 October 2016

Eldar Farseer - Conversion and Construction

I wanted my Farseer to be levitating with both feet off the ground. My plan was to take the Farseer’s torso and fix it to the legs from the Harlequin Solitaire to create the dynamic pose I desired.


The first stage was to do a rough test fit to see is the idea was even possible. For this I held the parts together with Blutack. From my test fitting it seemed clear that the concept would work and the parts were, with some serious trimming, compatible.

I removed the mould lines with a combination of scraping and sanding. It’s a fiddly job, but it’s essential to take the time and effort to get it done right. The discovery of a missed mould line once you’ve started painting will result in a world of pain!

With the parts cleaned up, it was then time to trim them to fit together. In this case that involved carving away a quantity of plastic from the inside of the Farseer’s outer robe and the Solitaire’s backside. It’s best to go slowly and carefully with this sort of work. Gradually shave away the plastic a little at a time while making frequent ‘test’ fittings. You want to avoid removing too much plastic. Once I was happy with the way the parts fitted together, I sanded the carved surfaces to a smooth finish. This was especially important on the inside of the long robe, as this previously concealed area will now be visible.

The parts were glued together using Humbrol’s plastic glue. I allowed plenty of time for the joins to set after I attached each part. Once all the parts were together, I let the glue fully harden overnight. This is an important process as you want a strong bond between the various parts. They will need to hold up during the next stage, which is gap filling and more sanding.

In the case of this conversion there weren’t too many gaps to deal with. However the waistline, where the parts from the two minis join, needed some attention.

I always take my time on the preparation of a mini. I find it tedious because I want to get on with the painting. But good prep work will enhance the finished mini just as bad prep will spoil it.

In order to achieve a levitating effect I needed to find a way of supporting the mini above the base. As GW have developed their plastic minis they have become increasingly bold with the poses and many of then, like the Solitaire, have a leaping aspect with a cunningly contrived point of attachment that leaves the feet free from the base. I needed to achieve something similar.

I had already given some thought to this when I was working on my Dark Eldar diorama and one of the options I’d considered provided a solution for my Farseer. I decided to create a long trailing sash that would act as a support for the mini. To do this I needed a material that was strong enough to support the mini while thin enough to be convincing as a sash. Brass sheet provided the solution with the added advantage that I was able to cut it with scissors and bend it to shape.