Showing posts with label daemon engine. Show all posts

Thursday, 27 October 2022

Project P30 - Part 16b

The End is Nigh - Part 2.


With the exception of the base (and that’s a whole new chapter) the remaining work on my Tank is a matter of finishing things off. Some parts need to be painted from scratch but most of the work involved tying-up lose ends from earlier work.

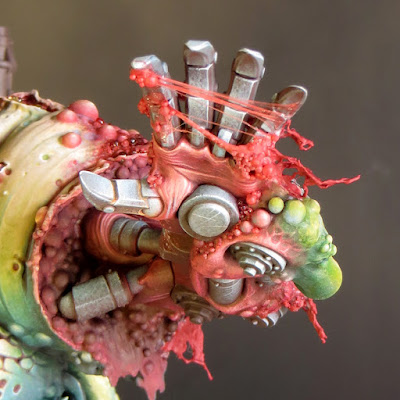
Fix the hand holding the bell into place.


This was a far more straightforward process than the mecha arm. I simply glued the bell hand in place with plastic glue. Once that had set, I filled the seam with dilute PVA and then retouched the paintwork. This felt like an enormously significant step as I was finally adding the sub-assemblies to the model. At long last it was all coming together!


Fix the chimneys back into place.


Now things really started to near completion as the re-addition of the chimneys would complete the model’s silhouette. I’d removed the chimneys earlier to make them easier to paint and I’d expected their reattachment to be a tricky process. In the end it went very smoothly. The chimneys were pinned, then glued back into position, leaving relatively minor seams to cover. For the smaller chimney, there was a matter of adding some corrosion over the join. A little corrosion can hide a multitude of sins! 


For the larger chimney, I had to re-sculpt some of the bubbly flesh texture over the join and then fill some hairline cracks with dilute PVA. I also added a few bony spines to this. Overall I’m very happy with the result. In fact, I think this area works better than it did before I removed the chimneys! Painting this area was a matter of matching up the colours to my existing scheme.

I was now finally able to add a long planned feature to the model. Some time ago I decided that I wanted coarse bristles sprouting from the Daemon’s back and shoulders. I’ve used grass tufts and paintbrush bristles to create similar effects in the past. 


My first attempt, using grass tufts, was an instant fail! The ‘hair’ looked too fluffy. Fluffy is not what we want or expect from Nurgle! For ‘plan B’ I used false eyelashes for the hairs which have a curve to them and taper to a point. They proved to be perfect. I cut them into small clusters, or individual hairs, and glued them into place with PVA. Once again this was tricky work but the final effect is exactly what I wanted!

4. Painting the Tentacles


I’ve a notebook with seven years worth of ideas written down for this project. As my plans developed and changed I kept notes to make sure nothing was forgotten. But, by the time I started painting, there were far to many, sometimes conflicting, plans for one project. Much of my decision making has been around which ideas to implement and which to reject. As the scheme developed the process of editing my plans became easier.

The tentacles are an example of the ‘less is more’ approach I’ve taken in the later stages of this project. I’d initially envisioned them as a larger version of the tentacles on Gutrot Spume, complete with stripes and dripping slime. But I felt that the stripes would bring an unnecessary new element to the scheme which would make the tentacles stand out from the rest of the model in an unsatisfactory way. 


Rather than stripes, I’ve painted the same freehand texture as used on the sides and back of the model. This adds interest to the tentacles but ties them in to the overall scheme. I’ve used colour to make them pop against the rest of the model. Starting from green hues at the base they graduate through a pinkish flesh tone to blue tips. The blue is my old favorite Bering Blue, which I’ve used throughout the scheme. It’s at its most obvious on the tentacle tips.

5. Add drool.


I rejected the idea of slime dripping from the tentacles as being just too much! This also applied to most of my plans for adding extra slime and goo to the model. My tank from 1990 has a liberal application of slime made from PVE glue and then painted. I strongly felt that I already had enough slime and goo on my new model and any more would begin to dominate the painting.

But there was one area where I very much wanted to break out the microbeads and water effects. This was the mouth (the one in the Daemon’s head) where I felt the addition of drool would be beneficial. The mouth was one of the very first areas I painted and its been a long wait to be able to finish it! 


I decided to focus the effect to one side of the mouth rather than filling the jaws with stringy drool. This was done with that old favorite UHU glue. Once the glue had set (it goes rubbery rather than hard) I built up several layers of water effects and microbeads. Once dry I gave it three coats of gloss varnish.

In the final of these updates I’ll describe how I made and painted the base for my Daemon Engine.

Tuesday, 29 March 2022

Project P30 - Part 14.

So just when I though I’d be getting back into the swing of things, with a regular painting schedule, life had other ideas! We’d been planning some long-overdue house renovations (by long I mean 20 years!) and had scheduled them in for 2022. However the chance came to get the work done earlier and we took it. As a result our home was in complete upheaval, from October until mid-January, and there was no way on earth I could do any painting. Stressful as the disruption was it’s been great to finally get our bathroom and kitchen sorted and things are now getting back to normal, whatever that is.

The enforced hiatus has given me the opportunity to take stock and realise that I’ve undergone a big shift in attitude towards this project. Up until now I’ve been very focussed on getting the paint scheme for my Daemon Engine up and running. It’s been a sign of my uncertainty that I’ve concentrated on establishing the colours, textures, overall contrast and direction for the scheme but haven’t really looked beyond that.

Over the last month that has changed and I quite suddenly realised that I’ve now painted the bulk (no pun intended) of the flesh on this model. I have no firm idea of how long it will actually take to complete, but it feels like I’ve reached a sort of halfway point in the painting! I’m well aware that much of what remains to be done features fiddly mechanical details but I’ve most definitely moved forward into a new phase of the project.

When I started work on this project, back in February 2019, it was with the final model very much in mind. But as I’ve progressed, and especially since I’ve started painting, my thinking became more wrapped up with the process rather than the end goal. I think this was necessary because I needed to make a lot of decisions about what I was actually going to do with my scheme, but it did overwhelm my thinking.

With some major decisions made (I’m sure there are many more to come!) and considerable progress under my belt, I can now see my way ahead. So much so that I’ve started to work on a base for this model. The end of the project may be some way off but I think it’s a good time to start planning for it. The overall composition of this model and its base will make or break this project so there is no room for a last minute solution! I have plenty of time for planning and preparing a base and I fully intend to use it.

My thoughts on basing the model have greatly evolved over time. I’d thought of something quite large and elaborate, inspired by the type of basing you often see for historical tank kits. Thankfully I saw sense as that would have taken the project into diorama territory. What I now intend is to base the tank as though it were, and in many ways it is, a character model.

I’m not going to say too much about my basing plans until later in the project. But I must say a huge ‘thank you’ to Byron Orde who, through the course of a general discussion about basing, helped me to clarify my ideas. However, Byron went above and beyond that with some significant practical help towards getting this model onto the right base. I don’t like to blow my own trumpet but, with the help I’ve had from Byron, and if I can pull off all my plans, it’s going to be epic!

But all of that is in the future and for the moment I need to crack on with painting. I will go into more detail in my next posting but for the time being I will bring things up-to-date with a summary.

Back in October I painted the large horns on the Daemon’s head. This was straightforward but very fiddly. I then moved onto the mechanical left hand and arm. I’d made a good start on these when everything ground to a halt. 

At the end of February I was able to pick up my brushes again but decided not to go straight back to the hand. I decided to paint a sub-assembly to help me get back into the swing of things. For this I chose to paint the large chimney which I first had to detach from the model! This was not a fun job but well worth the bother as the chimney was much easier to paint as a separate element. 


With the chimney painted, I’ve now returned to painting the mechanical hand and arm.


Saturday, 2 October 2021

Project P30 - Part 13.

Ding Dong!


I’m back! Not that I’ve been away as such but I decided to take a bit of a break from painting my Daemon Engine. Things had gone very well, and I’d made excellent progress, but I felt that I was beginning to get a bit too relaxed with the project. To do my best work I need to keep on my toes and I think I was getting a bit complacent. The break in painting has given me the opportunity to reset and refresh the feeling of a challenge. 
 

To get re-started I decided to paint the bell, which I’d been keeping back for just such an occasion. The bell was perfect to paint as a sub-assembly and, as it features distinct areas of flesh and metal, was also perfect to help me get back up to speed with the colour palette and techniques I’m using on this model.

Although this model will feature a variety of non-metallic metal (NMM) effects the majority of my metal will be painted in bronze tones. Often used for bells, cannon and in ancient armour, bronze seemed like the perfect choice for a model that features all of these. It also works very well with my overall colour palette not least because of the opportunity it gives me to use cool green hues in the verdigris effects.

As with all metals the colour of bronze, an alloy of copper and tin, will vary depending upon it’s exact composition, age and the conditions it’s been exposed to. Broadly speaking, bronze is a warm metallic hue along the lines of gold or brass; but slightly darker and browner than either, and less ‘orange’ than copper. In reality the colour bronze includes a wide range of tones and hues and can be achieved in many different ways.


I’d taken this into consideration when I created my initial colour palette but, as I‘ve now spent some time working with those colours, I decided to make some additions. The new colours are Balor Brown and Mournfang Brown both from Games Workshop and Ice Yellow from Vallejo Model Colour. The introduction of these colours has enabled me to create some warmer hues than my initial colour choices allowed. 
 

So far I’ve painted two distinct areas of bronze on my model: the back plate (including the shoulder) and the bell. Although both areas use colours from the same overall palette they have been treated quite differently. 

The back plate.


This is the single largest area of bronze on the model and much of it is in shadow. I decided that a warmer more saturated bronze would work best here, as it would have a strong contrast with the green hues in the adjacent areas of flesh and verdigris. In addition, a warmer and more saturated shadow colour gives more interest to the back of the model.


Base/shadows.


The base colour for this area is Rhinox Hide mixed with Boreal green and Black Leather. The additions serve to darken the Rhinox Hide.

Mid-tones.


I lightened the base colour with the addition of Mournfang Brown. As I moved into the mid-tones I increased the amount of the Mournfang and gradually began to add Balor Brown to my mix. The use of Mournfang Brown and Balor Brown give warmth and saturation to the final result.

Highlights.


As my colours go into the highlights, I introduced a mix of Balor Brown and Ice Yellow moving to pure ice yellow. The final highlights are Ice Yellow with a little white added. 
 

The use of Ice Yellow was a little risky as my global highlight colour is Flayed One Flesh and the introduction of a new highlight colour could cause a colour clash with previously painted areas. However, Ice yellow has, compared to Flayed One Flesh, a cooler more saturated yellow hue that works very well for bronze.

The bell.


Base/shadows


The base colour for the bell is a mix of Rhinox Hide, Boreal green and Black Leather. These are the same colours as on the back plate but there is less Rhinox Hide and more Boreal green and Black Leather in this mix. The resulting colour is darker, cooler and more desaturated.

Mid-tones


The biggest difference between the two bronze areas lies in the mid-tones. For the bell I have only used Balor Brown. This is mixed with the base colour in increasing amounts as the colour lightens. However, I have not used any pure Balor Brown on the bell.

Highlights.


As my colours have moved into the highlights, I’ve added Ice yellow to the Balor Brown/base colour mix. As with the back plate my highlights shift through pure Ice Yellow to an Ice Yellow/white mix. 
 

The final result for the bell is a bronze colour that is cooler, more desaturated and with shadows that are more blackened than the back plate.

The base/shadow mix of Rhinox Hide, Boreal green and Black Leather that I’m using on this model is one that I’ve often used before due to it’s flexibility. The mix gives a surprisingly dark result that I like to think of as ‘almost black’ and I can easily shift the temperature and saturation of this colour by altering the mix. 
 
A page from my notebook comparing my
'almost black' Black Leather/Boreal Green mix with Black

I’ll be adding more areas of bronze as my paint scheme progresses and I’m looking forward to creating more variations of this colour.

After painting the bell I turned my attention to the hand holding it; and what I thought would be relatively simple proved to be quite a challenge. As I said earlier part of my reason for painting the bell was to help me to get back up to speed with the colour palette. And it’s a good thing too. I forgot that my base colour for the flesh tones was a mix of two parts Rakarth Flesh with one part each of Bugman’s Glow and Sahara Yellow. Instead I used only Rakarth Flesh and it made a massive difference! The flesh tones were all far too cool and I had to glaze a lot of warm tones over this to balance things out. I’m now happy with the hand although I will almost certainly adjust it a little more once I glue it into place on the model.
 

As I’ve said before with this model nothing is finished until it’s all finished!


Saturday, 3 July 2021

Project P30 - Part 12

It’s time for a long overdue update! An interruption in my posting usually means that, for one reason or another, I’ve not been painting but that’s not the case this time! I’ve been happily painting away to a regular schedule and making steady progress. Quite simply when faced with a choice between painting and writing about painting I’ve opted for the former. 


I’ve already written about the physical challenges presented by this model and they haven’t lessened. However I’ve now become used to handling and painting a model of this size and I’m coping quite well with this aspect of the project. I think the greatest challenges remain the psychological ones! The scale and level of expectation for this project, both from others, and myself are through the roof.

However, in spite, or perhaps because, of these challenges I'm very happy with how my Tank is going at the moment! I've had so many ideas and options to consider that the project’s overall direction has been a bit open-ended. As I said in my last post, I've had to editing my ideas as I go. That’s involved making as many choices about what I’m not going to do as to what I am going to do! Because of this my vision for the paint scheme has become much clearer over the last month or so.

My experience of this project is unlike anything I’ve had since I returned to painting. I regularly feel that I’ve bitten off more than I can chew and this strongly reminds me of the years when I was first learning my craft! Although I have a wealth of experience to call on, I can’t take it for granted that I will succeed. This is because this work is truly challenging me and I’m having to work my very hardest to resolve every aspect of this project. All of this can only be a good thing and so far I’m loving (almost) every minute of it. I’m getting more satisfaction from my hobby than I’ve had for some time!

In my last post I’d just finished painting the arms. The next area I turned to was the top of the model where the neck, back and shoulders meet. This proved to be a far more complex job than I’d anticipated! This part of the model is a major junction between other areas and involves transitions between different forms, textures, tones and hues.


I’d initially considered painting the back, neck and shoulders with a dark green to create a counter shading effect similar to that on my plague bearers. I’ve retained an element of this but less pronounced than in my initial plans. My Tank is painted as though the light is hitting it from the top left. Broadly speaking there is a light (left) and a shade (right) side to the model. The upper back features the most obvious transition between them. In addition to the tonal transitions the hues on the shade side are cooler than those on the light side. 


Figuring out these transitions took a lot of going back and forth to adjust and balance all the factors but it was well worth the effort. With this area painted the separate areas I’d worked on previously are now connected and the paint scheme feels more unified and consistent. 


In the course of resolving this part of the model, I had to go back and adjust some of my earlier work. I’ve worked more of a purple hue into many of the shadows and strengthened the yellow/green hues in the mid-tone areas of the arms. Both of these changes were made by building up a series of controlled glazes over the appropriate areas. I fully expect to make further adjustments to my earlier work as the project progresses. I don’t consider any part of the model to be finished until the entire thing is finished.

I was then at the point where I needed to start addressing the boundaries between flesh and metal on my model. The upper area I had just painted is in contact with the large boiler/plate in the back of the model. The sides of the torso also connect with this area. When sculpting I’d decided to make a feature of this boundary and created an area of swollen bubbling flesh.


I’ve chosen to paint all areas of bubbling flesh on the model in warm red and flesh hues. The bubbling flesh often occurs where flesh and metal meet and I want it to have a raw and angry look as if it is trying to boil up and overwhelm the metal. 


Having resolved the overall flesh tones to my satisfaction it became very clear to me that I needed to begin painting the boiler/plate. To be honest I was ready for a change, as I’d been painting blubbery green flesh for weeks!

Coming soon…


As you can see from my pics I’ve gone well beyond the stages I’ve described in this post. I will next look at how I’ve painted NMM on the boiler/plate and how that has affected my overall colour palette. I will also describe my approach to painting corrosion on this model.