

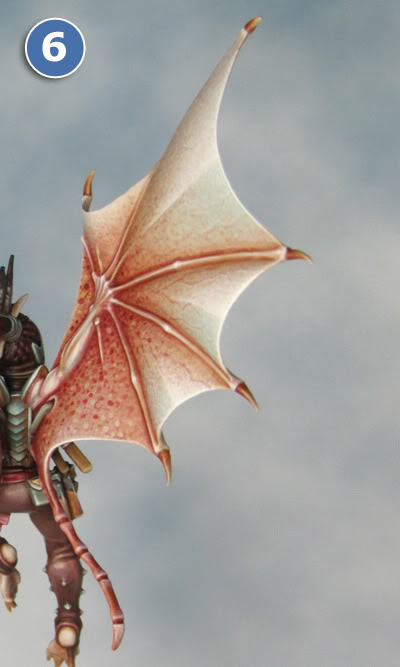
1. Base colour: Dheneb StoneWash: Gryphonne Sepia + Ogryn Flesh mix
Things are rough & ready at this stage.

2. Wash: Baal Red
Beginning to refine the wash in the crevices between the fingers with several diluted washes. Let each wash dry thoroughly before reapplying. Paint the veins in with thinned down Baal red. Begin to build up a stippled effect in the shaded areas.

3. Wash: Baal Red & Gryphonne Sepia
Continue to build up the stippled effect with Baal Red. Wash the arm, hand and fingers with Gryphonne Sepia. One again it gives a more subtle effect if you apply several dilute washes in stages.

4. Wash: Baal Red & Gryphonne Sepia
Highlight: Dheneb Stone & Dheneb Stone + Skull White mix
Continue to build up the washes and stipple effects. Highlight around the edges of the veins with Dheneb Stone and Dheneb Stone + Skull White mix. Keep the lighter tones towards the edge of the wing.
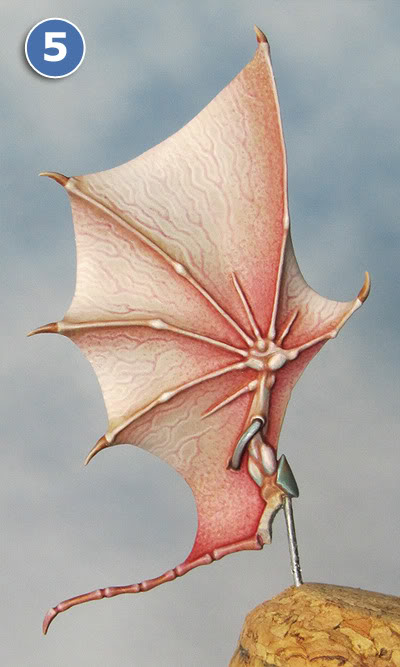
5. Highlight: Dheneb Stone, Dheneb Stone + Skull White mix, Skull White
Highlight the fingers keeping the lightest tones to the tips & knuckles.
Build up the highlights on the arms. Washing with a Baal Red & Gryphonne Sepia mix.
Highlight the wings with several very thin layers of dilute Dheneb Stone + Skull White mix. Keep the lightest shade at the edges of the wings. This ‘glazing’ of light tones will also knock back and soften the look of the veins.
6. The outside of the wings are painted using the same sort of process as the front but using a slightly stronger colour mix and bigger dots in the stippling. These are applied using a cocktail stick.
UPDATE 02.01.2012
As an addition to this step-by-step I’d like to present an illustrated guide to stippling. It’s something I get asked about on a fairly regular basis so I guess there needs to be a bit of explaining done and it’s easier to show rather than just tell.
Spots before your eyes – a guide to stippling
Great tutorial. You do the veins with the GW Baal red wash is that right? Never tried linging with a wash before so will give it a shot.
ReplyDeleteYes, I used GW Baal red wash for the veins. Ever so slightly diluted.
ReplyDeleteHow do you actually stipple? seems like an important process for this kind of work
ReplyDeleteStippling is a painting technique where you apply tiny dots of colour using the very tip of a fine brush. Varying the density and colour of the dots can create a shading/highlighting effect.
ReplyDeleteI’m putting together an illustrated guide to stippling, as it’s easier to show rather than just tell. I’ll get it up on the blog sometime Monday.
Excellent guide. I'll have this on one of my models.
ReplyDeleteAndy.
Thank you SO much for this tutorial. I have scoured the internet looking for examples of this and was thrilled to come upon, not just photos of a finished product, but an actual tutorial. Very helpful!
ReplyDeletethe result looks awesome but it also seems to be very time consuming for gaming models. how long did it take you to paint the wing?
ReplyDeleteEach wing took roughly two days to paint. I wouldn't for a moment consider spending this sort of time and effort on a gaming model but then all my minis are painted for display.
DeleteIf you wanted to you could do a quicker & rougher version for gaming but the whole point for me is to take the time to achieve the finish.