

When I last posted about my Demon Tank the project was running in the background alongside preparations for Golden Demon and my Troggoth workshop. I’d already sculpted a head and begun construction on the core of the tank. My efforts were then focused on the Tank elements as I’d reached the stage where I needed to start adapting them to fit my concept.
The Plagueburst Crawler features a heavy dozer blade but I’d decided not to include this. Without the blade the front of the tank has a rounded ‘bellied’ front, which was perfect for my project, as it would blend with the belly of the Great Unclean One that I was using. I had some major plans for the belly but first I had to remove the fixings for the dozer blade on the front of the tank. This was a fairly simple matter of removing two supporting struts but the side panels required a little more finesse.

The supporting struts are moulded onto the side panels and are recessed on the back. The first thing I did was to fill these recesses with milliput. Once that had fully set, I carved the struts away with a Dremmel tool. This exposed the milliput and all I had to do then was make sure the new surface of the side panel was smooth and even.
With the dozer blade removed, I thought I could begin to tackle the union of the tank and the Great Unclean One. But while I’d been working on the side panels I’d had the time to reconsider the work I’d done on the head. I was pleased with my sculpting overall but I felt that the head and face were lacking animation! The entire head sat on the body in a four-square manner much like my original Tank. In this respect I’d made my new Demon far too similar to the old one. From the very start of this project I’ve been certain that I needed to create a more dynamic model and composition than my 1990 original.
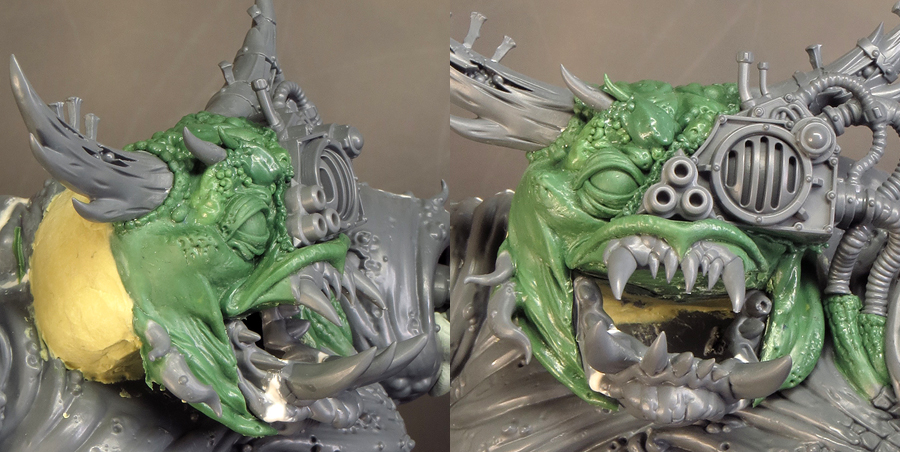

The solution was simple enough but required a little nerve. I prized the head off the body and repositioned it. By bringing the entire head forward and angling it round I’ve added a bit of a twist to the pose. This is a far more satisfying composition and helps to bring some life to my Demon. In addition I cut away the entire lower jaw and replaced it with one from a Mangler Squig. The new lower jaw is far more aggressive and the open mouth thus created made a much less passive face. I’m now far happier with how the head and face look and contribute to the overall composition of the Tank.
So finally I could turn my attention to how the Tank had been warped into the body of the Demon possessing it. That meant it was time for a big decision! A key feature of my old model is the gun and how it comes out of the Demon’s mouth. I definitely didn’t want to reproduce the exact same thing on my new model but I did want to pay homage to it. Many newer Nurgle models feature a gaping maw in their belly and this seemed to be the perfect solution. If I could create a gaping maw in my Demon’s belly I could place the plagueburst mortar right inside it.
This was going to involve some serious surgery to my kits and the prospect was a little daunting. If I got things wrong I would probably have to buy a new tank and start over again. I was also unsure as to how I could create the maw itself. I wanted teeth but it seemed unlikely I would find a kit with a mouth big enough to do the job. Such proved to be the case as my first attempt, using the Mangler Squig I later used in the face, failed. Then I spotted Ravenak’s Gnashing Jaws from the Malign Sorcery boxed set and this definitely had potential.

So with a little wrangling (and ebay) I got my hands on the parts I wanted. Now came the bit that required nerve, as I had to cut away the entire front of the Tank with my Dremmel. This went far more easily than I expected and I was finally able to test fit the jaws. It was another nervous moment as I was going by instinct alone. My guess that the jaws would fit well into the space proved correct. What I hadn’t anticipated was just how well they would fit because the curvature of the lower jaw fitted perfectly to the curvature of the Tank’s front. It was with great relief that I realized my plans were working!

To fix the jaws in permanently I had to separate the upper and lower jaws and remove a lot of excess plastic. I did this slowly, a bit at a time, and with lots of test fittings to ensure I didn’t remove too much. This ensured a nice tight fit and made it possible to glue the jaws directly to the Tank. Once the glue was set I used milliput to reinforce the join and fill the gaps.
I was now able to test fit all the major elements of my new Tank and, for the first time, see them all together. The assembly is very rough, involving a lot of Blu Tack, but I can finally see my concept for the overall composition. While there is clearly a lot of sculpting needed to properly tie everything together this feels like a big step forward. Up until now this model has existed only in my head but now I can see how everything sits together and focus my efforts on successfully unifying the elements. The assembly is going to be a long job but at least it’s no longer theoretical.


One thing I didn’t anticipate was the need to paint sub assemblies but I’ve decided that this is the only way to deal with the inside of the mouth and the plagueburst mortar. So I’ve broken out the paints and got to grips with the mortar. Once that’s done I can work on the union of the Great Unclean One, the Tank and the gaping belly maw. It’s going to be quite a challenge to sculpt this area but one I’m excited to take on because it’s going to make a huge difference to the look of this model.


