Wednesday 29 April 2015

From Zero to Hero - revisiting Squarg for Salute 2015


When Squarg came away from Euro Millitaire without even a ‘commended’ to his name I was deeply disappointed. To be honest, I felt that that was in no way a fair assessment of the mini but, as I said at the time, ‘that’s the way the cookie crumbles’ and the best thing to do was move on and get painting. 

I’m normally extremely reluctant to go back and make changes to a ‘finished’ mini. That’s not to say that I consider my work to be perfect! But I think it’s far more positive and productive to take the lessons learned and apply them to future projects. However, I decided that Squarg was a special case. 


 Although I didn’t seek any feedback I heard from several friends that there had been some comments about Squarg from the judges at Euro. Feedback is only ever going to be of use if you take it with an open mind and I was in no fit state at the time. 

The first thing that reached my ears from several sources was that the frog should have looked wet. The second was that Squarg’s back feet were not properly fixed to the base.

With the passing of time I was able to get Squarg out of the cabinet and reconsider him objectively. I still felt that Squarg was one of my best pieces and he deserved a fair crack of the whip. But only a fool refuses to consider feedback. 

The issue of how wet the frog should look was something I’d given a lot of thought to when I first painted him. I made tests with different finishes in an effort to achieve a suitably moist appearance but I decided to leave well alone. Shiny finishes looked tacky and unrealistic while satin finishes were not noticeably different from the natural sheen of the paint that I’d used, a mix of Vallejo & GW. The decision I made was right. I’m still perfectly happy with it and I stand by it. 

The back feet were a different matter. I knew that Squarg’s feet had been properly fitted to the base. I’d gone to great pains gently heating them so that they could be reshaped to fit the contours of the base. But what I’d missed was that they hadn’t stayed that way for very long! In particular there was a noticeable gap between Squarg’s back left foot and the base! 

I think the most likely explanation is that the original (very flat) shape of Squarg’s feet reasserted itself when I used a hairdryer to speed up the drying of some washes I’d applied to the base. And while in hindsight the gap looks obvious, I had totally missed it at the time. 

All well and good but what should I do about it? There was no way I would be attempting to reheat and bend the foot again, so I decided to fill the gap with something. After consideration that ‘something’ was more grass and moss. 

I had the Friday before Salute free to work on Squarg’s base and it was an extremely nervous day! I proceeded slowly by very carefully testing out several options before I had my solution. The use of a soft material meant that I could safely work it deep into the gap and then tease it back out for a natural effect. In the end I was very pleased with the result. The gap was no longer apparent and the new grass and moss looked like it had always been there. 


The extra grass and moss didn’t just fill up the gap in my opinion the base looked better with them. This led me to consider the overall appearance of the base and so I decided to increase the amount of green on the base. 

I did this in several ways:


1.
I added a few more strands of tall grass at the back of the base. On reflection the old grass formed two distinct clumps – one in each back corner and I wanted to soften these out


2.
I tinted the leaves on the tall grass at the back with a warmer shade of green that toned in with the frog’s flesh colour. I think that before the leaves were too pale and cool in tone


3.
I went back over much of the ground surface with glazes of green ink


4.
I added a mix of green ink, paint, PVA glue and baking soda to specific areas of the ground. This created areas of a fine, slightly soft, grainy texture that really helped to give the ground a damp marshy look. 


The actual change to the appearance of the base is subtle but it has a dramatic effect. With the overall increase of green the individual plant elements are slightly less distinct and now work better together as a whole. The base also now has a damper look to it more appropriate as the environment for a frog. 

I was far less nervous at Salute this year than is usual for me. That’s due to the event being more familiar rather than any growth in confidence. In the case of Squarg, I very much wanted him to do well but I really had nothing to lose as he couldn’t do any worse than he had done at Euro. 

Winning both First Place in his category and Best in Show is marvellous and I’m very proud of the achievement. 

I’ve experienced both the extreme highs and lows of competitive painting with this one mini and it’s a slightly odd experience with each tempering the other. 

In the end, I think the lesson Squarg has taught me is try not to be too overwhelmed by either success or failures because positive things can be found in both if you look for them.

Monday 27 April 2015

Salute 2015

With Mole done and dusted I had a little time to consider some other entries for Salute. So I was busy all day Friday making some adjustments to Squarg's base - that was very nervous work, but it was well worth the effort. I’ll post in more detail about Squarg’s base, the changes I made to it and why I made those changes, in the near future.

When the big day arrived it found me in a calmer frame of mind than in previous years. It might just be possible that I’m finally getting used to entering painting competitions and I have my nerves under better control!

Salute seemed to be bigger and busier than ever but the venue had much more space this year and that made for a more enjoyable overall experience. As usual the day seemed to go very quickly with the painting comp, stands, games and socializing (always the best thing about these events) making for a busy time. Before I’d managed to get round and see everything it was time for the painting competition results.


Uncle John made it through to the finals. Mole got First Place in Science Fiction Single Figure and, to my utter delight, Squarg got First Place in Fantasy Creature or Vehicle. But that's not the best of it because Squarg also won Best in Show! Needless to say I'm a very happy bunny.

Saturday 25 April 2015

Infamy's Mole - Part 6

Here he is - and I finished him in time for Salute.

I made all my usual mistakes when I was building the base for Mole. The first thing I tried out involved ruined walls. However, after several days of playing around with different compositions, I realised that this was simply the wrong thing for me to be doing with Mole. For my taste, Mole looks much better on a simpler base with no backdrop.


With that decision made I set about constructing the base onto a plinth. I’d decided on a brick paved ground surface with layers of earth beneath. I would also incorporate a pit of some sort to tie in with the idea of Mole’s role as an excavator. 


The ground was built up with and carved away from cork. The brick paving was made with a set of tiny plaster bricks purchased from the Wamp Store. I decided to lay the bricks in a herring-bone pattern for visual interest. The bricks were set onto a layer of PVA wood glue and nudged into position with a sculpting tool. When the glue had set I brushed a little dried garden soil into the gaps between bricks. This was then carefully painted with dilute PVA which soaked into the soil and held it all together. It was a bit of a fiddly process but worth the effort, I think. 

The surface texture of the earth was achieved by painting the cork with dilute PVA and sprinkling it with more dried garden soil. The addition of a few old watch parts (also purchased from the Wamp Store) added some steampunk detail. 


My first version of this base had the earth breaking free from the edges of the cube in a muffin top effect. I really didn’t like it! It still felt too big and clumsy for Mole so I took a risk and cut it free from the cube. I then carved and filed the sides down flat. I’m much happier with this more austere composition. A test fitting of Mole confirmed my feelings. To give height to the composition, I added a lamp post to the base. 


Painting the base was fairly straightforward. I used the same palette of colours that I’d worked with on Mole to tie the Mini and base together. I paid special attention to the colour of the earth. A solid brown mud colour would not have looked very realistic or interesting. I graduated the earth from a drier gritty looking grey at the top down through dusty browns to a darker earth colour at the bottom. I also made use of the matt/gloss properties of my paints to reinforce the feeling that the earth was dry at the top and damp deeper down. 

Monday 20 April 2015

Infamy's Mole - Part 5

Mole is finished but I'm going to keep him under wraps until Salute at the weekend! That's partly because I'm a big tease and partly to give myself some breathing room to see if I want to make any tweaks and adjustments before the reveal.

In the meantime here are a few teaser pics of Mole's base.


Thursday 9 April 2015

Infamy's Mole - Part 4

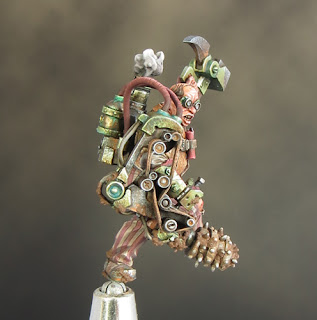
It’s been a long time since I’ve painted any significant areas of true metallic on a mini so I’ve become, if you’ll excuse the pun, a little rusty on the subject. My decision to paint Mole in a muted colour palette, and a less cartoony (than usual) style, meant that true metallic seemed to be the way to go with him. Over the years, I’ve swung back and forth between true metallic metals (TMM) and non-metallic metals (NMM) and finally decided that no one was ‘better’ than the other. For me it’s simply down to a matter of personal preference and what feels appropriate. 

In common with many other steampunk minis, Mole provides the opportunity to paint several different types of contrasting metal. That said I think it’s important to plan out a scheme for the metallics. It would be all too easy to go over the top and paint a confusing scheme. I decided that Mole’s drilling rig would consist primarily of steel & brass with a few touches of copper. The metals could then be weathered to different degrees depending on their age and the nature of their use. 

The first piece of Mole’s digging equipment to be painted was the hammer. All the metals would be fairly dirty and worn but I decided that the hammer would look slightly newer than the main drilling rig. To do this, I went a little brighter on the highlights and less heavy on the weathering than I planned to do elsewhere. 


 Next to be painted was the boiler & furnace strapped to Mole’s back. I wanted this to look very dirty. I very rarely use pure black in my mini painting but black was essential to give a sooty look to the weathering on the furnace. Pure black alone would, however, have looked rather flat and dead in contrast to the rest of the mini. To counter this I incorporated several shades of brown & orange into my glazes. 


The boiler was painted in copper and brass. I wanted it to look old and leaky which gave me the opportunity to add some verdigris. The green tones that I’ve used to age the brass and copper add interest to the overall colour palette by providing a contrast to the red areas. The overall look might be fairly desaturated but it helps to have a few spots of stronger colour. 

The process of painting metallics seems to be fairly straightforward. I’ve achieved my best results by working over a metallic base colour with glazes and then refining this with a combination of metallic highlights and further glazes. This involves a lot of going back and forth between the highlights and glazes to refine the results and build some character into the metalics. As I said in my previous post, I’ve found it necessary to use washes, paints and inks in the glazes to achieve a satisfactory finish. The different materials give me a good range matt/gloss finishes to use as seems appropriate. 


In spite of my initial hesitation, I’ve enjoyed using true metallics on Mole. I’d forgotten just how varied and versatile they are and I’m already planning a future project that will require more metal to be painted. 

The long Easter weekend gave me the opportunity to crack on with Mole and get some serious painting time under my belt. As a result I’ve just about finished painting him! That leaves me couple of weeks to sort out a display base and takes a lot of the deadline pressure off my shoulders. 

I’d feared that project ‘moving Mum & Dad’ would seriously impact on my ability to finish Mole in time for Salute. As it turns out Mole took less time to paint than anticipated and I’ve turned him around in a month.