I’m back from Euro Militaire with a bronze for Uncle John but Squarg didn’t get anything. I can't pretend I'm not feeling gutted but I guess that's the way the cookie crumbles. What saved the day for me was getting to meet up and socialise with so many painters and all round good guys! And I've come away from Euro with a modest but exciting stash of goodies, so I've got some really interesting projects to look forward to. The best bit of all was seeing my mate Andy win gold. I swear he was so happy he was floating a few inches off the floor!
Inspired, I’m getting straight back to painting and I'm starting a single 40k figure for Golden Demon. Or I will when it comes out tomorrow! This is probably the stupidest thing I've decided to do in a long time. The time scale is mental and I have doubts about being able to do a really good piece in such a short timescale (if I can finish it at all). But as I’ve decided to go to GD I'd like to at least try to take part.
This means I have to try and paint a quality mini in two weeks – like I said mental!

Friday, 26 September 2014
Friday, 19 September 2014
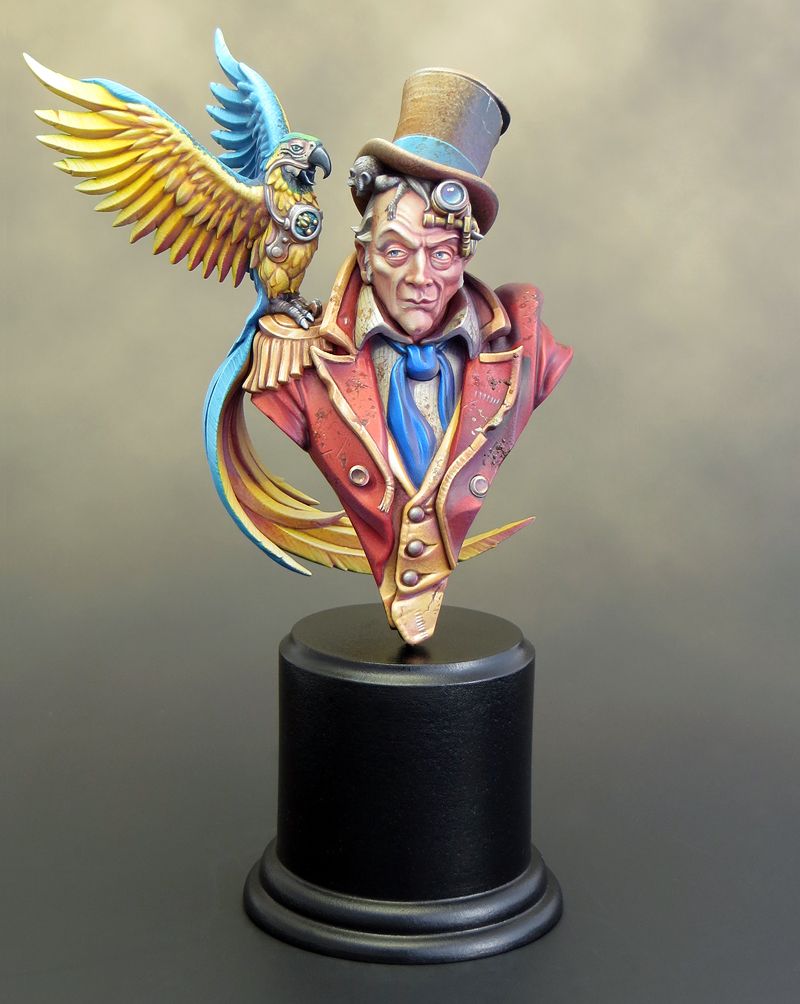
Finishing Uncle John
With the parrot painted it was time to assemble the separate elements and finish off the Uncle John bust. As often seems to be the case everything came together very quickly in the end! My biggest concern was with how well the parrot would fit but, after a couple of dodgy test fittings, it slipped into place almost perfectly. There was a very slight space under the feet but a little dilute PVA flowed into the crack and filled the gap.
I’d prepared a couple of alternative plinths for Uncle John in advance. I thought the best option would be a rectangular plinth with a tapered top but, because the parrot’s tail comes down behind Uncle John’s shoulders, the angle of the taper just didn’t suit (or fit) the bust. In the end a simple flat topped round plinth was the best option.

In just three hours time I'll be heading off to Folkestone for Euro Millitaire and I'm as ready as I can be. Finishing off a project is often a slightly odd experience. It's usually a matter of deciding to stop rather than actually completing every possible tweak and adjustment to the peak of perfection. It's important to know when to stop and move on to the next project.
It’s now been a year since I won the Slayer Sword and in that time I’ve completed four projects. Chee-Chee, Jason and the Golden Fleece, Squarg and Uncle John. With Chee-Chee and Jason I consolidated the developments I’d made while working on the Dark Eldar diorama. With both the Uncle John and Squarg miniatures, I’ve expanded my range of painting techniques by working with transparency over a light background and by the application of texture.
I’m now very much looking forward to taking what I’ve learnt and developing it further. For my next project I’m going to be painting Commodore Borgossa from LeBeN Studio. He may be a pirate but I can absolutely guarantee there will be no trace of a bloody parrot anywhere near this project!
I’d prepared a couple of alternative plinths for Uncle John in advance. I thought the best option would be a rectangular plinth with a tapered top but, because the parrot’s tail comes down behind Uncle John’s shoulders, the angle of the taper just didn’t suit (or fit) the bust. In the end a simple flat topped round plinth was the best option.
In just three hours time I'll be heading off to Folkestone for Euro Millitaire and I'm as ready as I can be. Finishing off a project is often a slightly odd experience. It's usually a matter of deciding to stop rather than actually completing every possible tweak and adjustment to the peak of perfection. It's important to know when to stop and move on to the next project.
It’s now been a year since I won the Slayer Sword and in that time I’ve completed four projects. Chee-Chee, Jason and the Golden Fleece, Squarg and Uncle John. With Chee-Chee and Jason I consolidated the developments I’d made while working on the Dark Eldar diorama. With both the Uncle John and Squarg miniatures, I’ve expanded my range of painting techniques by working with transparency over a light background and by the application of texture.
I’m now very much looking forward to taking what I’ve learnt and developing it further. For my next project I’m going to be painting Commodore Borgossa from LeBeN Studio. He may be a pirate but I can absolutely guarantee there will be no trace of a bloody parrot anywhere near this project!
Sunday, 14 September 2014
Painting Uncle John – Part 6
Polly is painted!
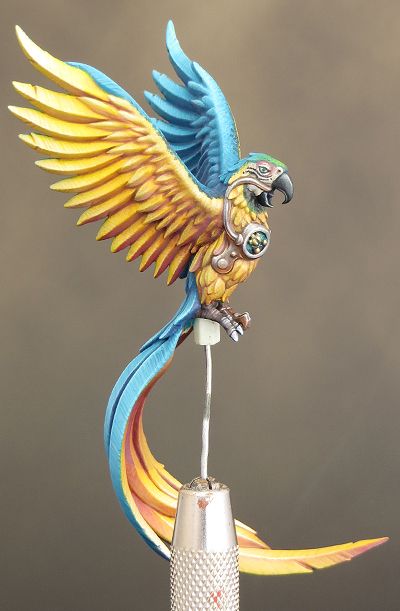

I’ve finished the parrot with
a sense of relief! Unlike the rest of the bust it felt like a struggle to
resolve this part of the paint job satisfactorily, but I eventually got there.
As I’ve said before I probably blundered with my choice of a lemon yellow base
colour. Although now the parrot is finished, I like the vibrancy of colour that
I’ve gained through having such a bright base colour - so it all turned out
well in the end.
The other issue I’ve had was
around painting the feathers. The sculpt is quite stylised; not least because
it has been ‘blown up’ from it’s intended use as a 32mm scale miniature.
That’s provided the challenge of deciding where to pitch my paint job between
realistic and cartoony. It’s something I’ve continually had to play with as I’ve
painted the parrot and, over all, I’m pleased with the final result. Painting
this part of the parrot became a happier experience as things progressed, so
I’ll take that as a good sign.
Now everything is painted I
have to fix the Parrot onto Uncle John’s shoulder. Then I
shall turn my attention to the long list of tweaks and adjustments I’ve been
compiling as the job has progressed. This will need to be a considered process
as some extra touches may well refine and improve things, but as we all know,
it’s easy to go too far and over work a paint job.
When all the painting is
finally done I’ll mount the bust onto a plinth. I’ve already prepared two
alternatives, so I can see what works best for the bust. Then it’s a matter of
making up some transportation boxes for both Uncle John and Squarg ready for Euro Militaire next
Saturday. It’s going to be a busy few days!
Wednesday, 10 September 2014
Painting Uncle John – Colour Palette
Now that I have the majority of the Uncle John bust painted it seems like a good time to talk about the colour palette I’ve been using. Unless otherwise stated all the colours used are from Games Workshop. (VMC has been used to show when Vallejo Model Colour has been used.)
The key colours for this particular palette are Xereus Purple and Dark Flesh (VMC). Broadly speaking the purple is used in the shadows and the Dark Flesh, in reality a shade of yellow, in the highlights. This is a high contrast colour combination and hopefully I’ve avoided the extremes and managed to achieve an energetic, but not violent, level of contrast.
Uncle John’s costume and parrot are painted with the primary colours red, yellow and blue. This could easily result in an overly bright and cartoonish look but the colour palette I’ve used helps to provide an overall harmony. This is achieved by having common colours that are used in all the areas regardless of the apparent colour. The Dark Flesh and purple are the most obvious colours used this way but the entire bust employs a relatively limited palette.

Unsurprisingly the flesh tones are the most complex areas with regard to the colours used. The flesh areas were painted first and have heavily influenced the overall colour palette. All of the colours in the flesh have been used elsewhere on the bust.
I’ve broken the colours down into shadows, mid tones and highlights but the process was far more intuitive than step-by-step. The shadows were blocked in over the base colour to provide a bold foundation for the more subtle mid tones and highlights. The colours were then applied in many thin glazes and built-up using transparency. The colours were mixed together in many different combinations and used across all areas of the face. For example a Ratskin Flesh and Rakarth Flesh mix served as a shadow on the light side of the face but also features in the highlights on the dark side of the face. For the most part Rakarth Flesh is the lightest colour used on the highlights with only a very little ivory here and there. The Rakarth Flesh is a key colour in the flesh tones as it has a cool almost grey quality and helps to calm down and unify the brighter colours.

The shirt provides an area of neutral colour to contrast the brighter shades around it. Of particular note is the combination of Baneblade Brown and Xereus Purple in the shadows. These colours were mixed to create an interesting range of greyish/purple tones that I’m sure I’ll be putting to good use in the future.
The use of pure Enchanted Blue in the mid-tones gave the tie the intense bright blue I wanted. Adding purple and a few touches of Dark Flesh to the shadows helped to link the blue into the rest of the palette.
Highlights:
Waistcoat and Gold Trim

Yellow can be a challenging colour to paint but the addition of other colours from the palette has added interest and variety. The purple was difficult to incorporate into the shadows without creating a psychedelic effect but I overcame this with the addition of Bugman’s Glow and Dark Flesh in the mix and as separate glaze layers.
Shadows:
Highlights:

I expected the coat to be tricky! Red can be a notoriously difficult colour to highlight but things went surprisingly well. This was partly the result of making sure that the highlights stayed in the orange part of the spectrum and avoided pink tones. But for the most part the red went well because I started off with a base colour in the lighter mid-tone range and most of the painting involved adding in the deeper tones and shadows. Working from light to dark really helped me to get the sort of red I wanted, and avoided any problems with chalky highlights.
Mid-tones:
Highlights:

The hat has been painted using a combination of stippling and glazes. It was painted, for the most part, from light to dark.
Highlights:
The hat band was painted with Sotek Green. It was shaded with Xereus Purple and Dark Sea Blue (VMC) and highlighted with a Sotek Green and Ice Blue mix. Ivory (VMC) was added for the final highlights.
In a few areas I needed a very deep shadow colour. This was achieved by using a combination of Dark Sea Blue (VMC) and Rhinox Hide. These were used on their own and in combination with each other and the area’s predominant colour.
The key colours for this particular palette are Xereus Purple and Dark Flesh (VMC). Broadly speaking the purple is used in the shadows and the Dark Flesh, in reality a shade of yellow, in the highlights. This is a high contrast colour combination and hopefully I’ve avoided the extremes and managed to achieve an energetic, but not violent, level of contrast.
Uncle John’s costume and parrot are painted with the primary colours red, yellow and blue. This could easily result in an overly bright and cartoonish look but the colour palette I’ve used helps to provide an overall harmony. This is achieved by having common colours that are used in all the areas regardless of the apparent colour. The Dark Flesh and purple are the most obvious colours used this way but the entire bust employs a relatively limited palette.
The Flesh Tones

Unsurprisingly the flesh tones are the most complex areas with regard to the colours used. The flesh areas were painted first and have heavily influenced the overall colour palette. All of the colours in the flesh have been used elsewhere on the bust.
I’ve broken the colours down into shadows, mid tones and highlights but the process was far more intuitive than step-by-step. The shadows were blocked in over the base colour to provide a bold foundation for the more subtle mid tones and highlights. The colours were then applied in many thin glazes and built-up using transparency. The colours were mixed together in many different combinations and used across all areas of the face. For example a Ratskin Flesh and Rakarth Flesh mix served as a shadow on the light side of the face but also features in the highlights on the dark side of the face. For the most part Rakarth Flesh is the lightest colour used on the highlights with only a very little ivory here and there. The Rakarth Flesh is a key colour in the flesh tones as it has a cool almost grey quality and helps to calm down and unify the brighter colours.
Base Colour:
 |
| Rakarth Flesh |
Shadows:
 |
| Bugman’s Glow + Xereus Purple mix |
Mid-tones:
 |
| Ratskin Flesh |
 |
| Bugman’s Glow |
|
| Rakarth Flesh |
 |
| Xereus Purple |
 |
| Mournfang Brown |
 |
| Evil Sunz Scarlet |
 |
| Dark Flesh (VMC) |
Highlights:
|
| Rakarth Flesh |
 |
| Ivory (VMC) |
|
| Dark Flesh (VMC) |
Shirt

The shirt provides an area of neutral colour to contrast the brighter shades around it. Of particular note is the combination of Baneblade Brown and Xereus Purple in the shadows. These colours were mixed to create an interesting range of greyish/purple tones that I’m sure I’ll be putting to good use in the future.
Base Colour & Mid-tones:
|
| Rakarth Flesh |
Shadows:
 |
| Baneblade Brown |
|
| Xereus Purple |
Highlights:
|
| Rakarth Flesh |
| |
| Ivory (VMC) |
Silk Tie
The use of pure Enchanted Blue in the mid-tones gave the tie the intense bright blue I wanted. Adding purple and a few touches of Dark Flesh to the shadows helped to link the blue into the rest of the palette.
Base Colour:
 |
| Enchanted Blue |
Shadows:
|
| Enchanted Blue |
|
| Xereus Purple |
|
| Dark Flesh (VMC) |
Mid-tones:
|
| Enchanted Blue |
Highlights:
|
| Enchanted Blue |
 |
| Ice Blue |
|
| Ivory (VMC) |
Waistcoat and Gold Trim
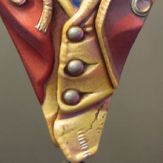
Yellow can be a challenging colour to paint but the addition of other colours from the palette has added interest and variety. The purple was difficult to incorporate into the shadows without creating a psychedelic effect but I overcame this with the addition of Bugman’s Glow and Dark Flesh in the mix and as separate glaze layers.
Base Colour:
 |
| Mournfang Brown & Iyaden Darksun mix |
Shadows:
|
| Mournfang Brown |
|
| Xereus Purple |
|
| Bugman’s Glow |
Mid-tones:
 |
| Iyaden Darksun |
|
| Bugman’s Glow |
|
| Dark Flesh (VMC) |
Highlights:
|
| Dark Flesh (VMC) |
|
| Ivory (VMC) |
Ringmasters Coat.
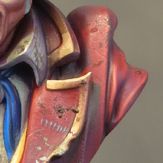
I expected the coat to be tricky! Red can be a notoriously difficult colour to highlight but things went surprisingly well. This was partly the result of making sure that the highlights stayed in the orange part of the spectrum and avoided pink tones. But for the most part the red went well because I started off with a base colour in the lighter mid-tone range and most of the painting involved adding in the deeper tones and shadows. Working from light to dark really helped me to get the sort of red I wanted, and avoided any problems with chalky highlights.
Base Colour:
 |
| Merchrite Red + Xereus Purple + Evil Sunz Scarlet mix |
Shadows:
|
| Base colour |
|
| Xereus Purple |
|
| Rhinox Hide |
Mid-tones:
|
| Base colour |
|
| Evil Sunz Scarlet |
Highlights:
 |
| Wildrider Red |
|
| Dark Flesh (VMC) |
Hat
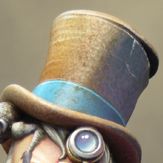
The hat has been painted using a combination of stippling and glazes. It was painted, for the most part, from light to dark.
Base Colour:
|
| Rakarth Flesh |
Shadows:
|
| Xereus Purple |
|
| Mournfang Brown |
 |
| Dark Sea Blue (VMC) |
Mid-tones:
|
| Mournfang Brown |
|
| Baneblade Brown |
 |
| Seraphim Sepia |
Highlights:
|
| Seraphim Sepia |
|
| Ivory (VMC) |
The hat band was painted with Sotek Green. It was shaded with Xereus Purple and Dark Sea Blue (VMC) and highlighted with a Sotek Green and Ice Blue mix. Ivory (VMC) was added for the final highlights.
 |
| Sotek Green |
|
| Xereus Purple |
|
| Dark Sea Blue (VMC) |
|
| Ice Blue |
|
| Ivory (VMC) |
Deep Shadows
In a few areas I needed a very deep shadow colour. This was achieved by using a combination of Dark Sea Blue (VMC) and Rhinox Hide. These were used on their own and in combination with each other and the area’s predominant colour.
 |
| Rhinox Hide |
|
| Dark Sea Blue (VMC) |
Subscribe to:
Posts (Atom)