Saturday 2 October 2021

Project P30 - Part 13.

Ding Dong!


I’m back! Not that I’ve been away as such but I decided to take a bit of a break from painting my Daemon Engine. Things had gone very well, and I’d made excellent progress, but I felt that I was beginning to get a bit too relaxed with the project. To do my best work I need to keep on my toes and I think I was getting a bit complacent. The break in painting has given me the opportunity to reset and refresh the feeling of a challenge. 
 

To get re-started I decided to paint the bell, which I’d been keeping back for just such an occasion. The bell was perfect to paint as a sub-assembly and, as it features distinct areas of flesh and metal, was also perfect to help me get back up to speed with the colour palette and techniques I’m using on this model.

Although this model will feature a variety of non-metallic metal (NMM) effects the majority of my metal will be painted in bronze tones. Often used for bells, cannon and in ancient armour, bronze seemed like the perfect choice for a model that features all of these. It also works very well with my overall colour palette not least because of the opportunity it gives me to use cool green hues in the verdigris effects.

As with all metals the colour of bronze, an alloy of copper and tin, will vary depending upon it’s exact composition, age and the conditions it’s been exposed to. Broadly speaking, bronze is a warm metallic hue along the lines of gold or brass; but slightly darker and browner than either, and less ‘orange’ than copper. In reality the colour bronze includes a wide range of tones and hues and can be achieved in many different ways.


I’d taken this into consideration when I created my initial colour palette but, as I‘ve now spent some time working with those colours, I decided to make some additions. The new colours are Balor Brown and Mournfang Brown both from Games Workshop and Ice Yellow from Vallejo Model Colour. The introduction of these colours has enabled me to create some warmer hues than my initial colour choices allowed. 
 

So far I’ve painted two distinct areas of bronze on my model: the back plate (including the shoulder) and the bell. Although both areas use colours from the same overall palette they have been treated quite differently. 

The back plate.


This is the single largest area of bronze on the model and much of it is in shadow. I decided that a warmer more saturated bronze would work best here, as it would have a strong contrast with the green hues in the adjacent areas of flesh and verdigris. In addition, a warmer and more saturated shadow colour gives more interest to the back of the model.


Base/shadows.


The base colour for this area is Rhinox Hide mixed with Boreal green and Black Leather. The additions serve to darken the Rhinox Hide.

Mid-tones.


I lightened the base colour with the addition of Mournfang Brown. As I moved into the mid-tones I increased the amount of the Mournfang and gradually began to add Balor Brown to my mix. The use of Mournfang Brown and Balor Brown give warmth and saturation to the final result.

Highlights.


As my colours go into the highlights, I introduced a mix of Balor Brown and Ice Yellow moving to pure ice yellow. The final highlights are Ice Yellow with a little white added. 
 

The use of Ice Yellow was a little risky as my global highlight colour is Flayed One Flesh and the introduction of a new highlight colour could cause a colour clash with previously painted areas. However, Ice yellow has, compared to Flayed One Flesh, a cooler more saturated yellow hue that works very well for bronze.

The bell.


Base/shadows


The base colour for the bell is a mix of Rhinox Hide, Boreal green and Black Leather. These are the same colours as on the back plate but there is less Rhinox Hide and more Boreal green and Black Leather in this mix. The resulting colour is darker, cooler and more desaturated.

Mid-tones


The biggest difference between the two bronze areas lies in the mid-tones. For the bell I have only used Balor Brown. This is mixed with the base colour in increasing amounts as the colour lightens. However, I have not used any pure Balor Brown on the bell.

Highlights.


As my colours have moved into the highlights, I’ve added Ice yellow to the Balor Brown/base colour mix. As with the back plate my highlights shift through pure Ice Yellow to an Ice Yellow/white mix. 
 

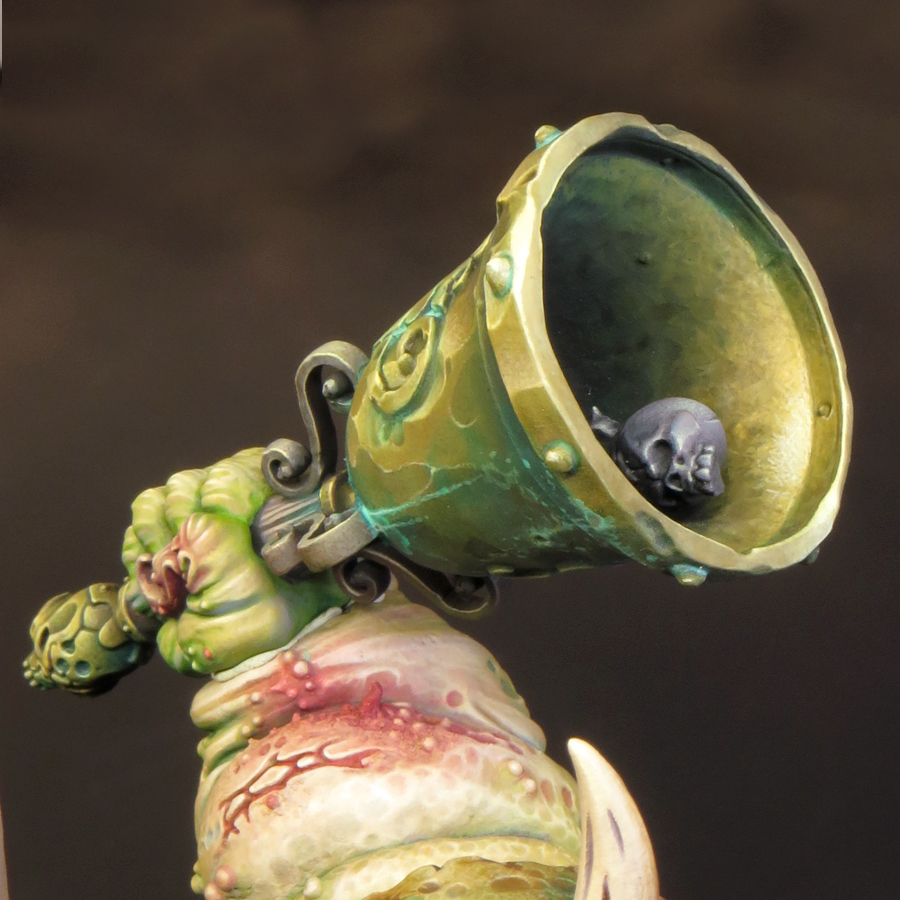
The final result for the bell is a bronze colour that is cooler, more desaturated and with shadows that are more blackened than the back plate.

The base/shadow mix of Rhinox Hide, Boreal green and Black Leather that I’m using on this model is one that I’ve often used before due to it’s flexibility. The mix gives a surprisingly dark result that I like to think of as ‘almost black’ and I can easily shift the temperature and saturation of this colour by altering the mix. 
 
A page from my notebook comparing my
'almost black' Black Leather/Boreal Green mix with Black

I’ll be adding more areas of bronze as my paint scheme progresses and I’m looking forward to creating more variations of this colour.

After painting the bell I turned my attention to the hand holding it; and what I thought would be relatively simple proved to be quite a challenge. As I said earlier part of my reason for painting the bell was to help me to get back up to speed with the colour palette. And it’s a good thing too. I forgot that my base colour for the flesh tones was a mix of two parts Rakarth Flesh with one part each of Bugman’s Glow and Sahara Yellow. Instead I used only Rakarth Flesh and it made a massive difference! The flesh tones were all far too cool and I had to glaze a lot of warm tones over this to balance things out. I’m now happy with the hand although I will almost certainly adjust it a little more once I glue it into place on the model.
 

As I’ve said before with this model nothing is finished until it’s all finished!


Saturday 3 July 2021

Project P30 - Part 12

It’s time for a long overdue update! An interruption in my posting usually means that, for one reason or another, I’ve not been painting but that’s not the case this time! I’ve been happily painting away to a regular schedule and making steady progress. Quite simply when faced with a choice between painting and writing about painting I’ve opted for the former. 


I’ve already written about the physical challenges presented by this model and they haven’t lessened. However I’ve now become used to handling and painting a model of this size and I’m coping quite well with this aspect of the project. I think the greatest challenges remain the psychological ones! The scale and level of expectation for this project, both from others, and myself are through the roof.

However, in spite, or perhaps because, of these challenges I'm very happy with how my Tank is going at the moment! I've had so many ideas and options to consider that the project’s overall direction has been a bit open-ended. As I said in my last post, I've had to editing my ideas as I go. That’s involved making as many choices about what I’m not going to do as to what I am going to do! Because of this my vision for the paint scheme has become much clearer over the last month or so.

My experience of this project is unlike anything I’ve had since I returned to painting. I regularly feel that I’ve bitten off more than I can chew and this strongly reminds me of the years when I was first learning my craft! Although I have a wealth of experience to call on, I can’t take it for granted that I will succeed. This is because this work is truly challenging me and I’m having to work my very hardest to resolve every aspect of this project. All of this can only be a good thing and so far I’m loving (almost) every minute of it. I’m getting more satisfaction from my hobby than I’ve had for some time!

In my last post I’d just finished painting the arms. The next area I turned to was the top of the model where the neck, back and shoulders meet. This proved to be a far more complex job than I’d anticipated! This part of the model is a major junction between other areas and involves transitions between different forms, textures, tones and hues.


I’d initially considered painting the back, neck and shoulders with a dark green to create a counter shading effect similar to that on my plague bearers. I’ve retained an element of this but less pronounced than in my initial plans. My Tank is painted as though the light is hitting it from the top left. Broadly speaking there is a light (left) and a shade (right) side to the model. The upper back features the most obvious transition between them. In addition to the tonal transitions the hues on the shade side are cooler than those on the light side. 


Figuring out these transitions took a lot of going back and forth to adjust and balance all the factors but it was well worth the effort. With this area painted the separate areas I’d worked on previously are now connected and the paint scheme feels more unified and consistent. 


In the course of resolving this part of the model, I had to go back and adjust some of my earlier work. I’ve worked more of a purple hue into many of the shadows and strengthened the yellow/green hues in the mid-tone areas of the arms. Both of these changes were made by building up a series of controlled glazes over the appropriate areas. I fully expect to make further adjustments to my earlier work as the project progresses. I don’t consider any part of the model to be finished until the entire thing is finished.

I was then at the point where I needed to start addressing the boundaries between flesh and metal on my model. The upper area I had just painted is in contact with the large boiler/plate in the back of the model. The sides of the torso also connect with this area. When sculpting I’d decided to make a feature of this boundary and created an area of swollen bubbling flesh.


I’ve chosen to paint all areas of bubbling flesh on the model in warm red and flesh hues. The bubbling flesh often occurs where flesh and metal meet and I want it to have a raw and angry look as if it is trying to boil up and overwhelm the metal. 


Having resolved the overall flesh tones to my satisfaction it became very clear to me that I needed to begin painting the boiler/plate. To be honest I was ready for a change, as I’d been painting blubbery green flesh for weeks!

Coming soon…


As you can see from my pics I’ve gone well beyond the stages I’ve described in this post. I will next look at how I’ve painted NMM on the boiler/plate and how that has affected my overall colour palette. I will also describe my approach to painting corrosion on this model.

Thursday 29 April 2021

Project P30 - Part 11

Skulls, Nurglings, Tentacles and a spot of bother with my microbeads!

Since I started painting my Daemon Engine at the beginning of February, I’ve made very good progress because I’ve managed to paint for a few hours almost every day. In fact, at times, I’ve almost gotten ahead of myself. I went into the painting stage of this project with a plan, of course, but I had many different options. That’s because I’ve spent years thinking about this project so I have a lot of ideas for how I could paint it. Far more ideas than I can (or should) incorporate into one scheme! 


So part of the challenge I face is to sort through all the ideas I have and edit them down to those I’m going to implement. I have to make just as many choices about what I’m not going to do as to what I am going to do. This is where my notebook and a file of reference/inspirational images have come to the rescue. They help me to keep track of my changing ideas and make sure I don’t forget any of them when the time comes to make a decision. This is an ongoing process because the more I paint the more resolved my ideas become but they can also develop in directions I’d not anticipated.

Every now and then I need to pause, sit back and consider my work. Which is just what I hadn’t been doing so it should come as no surprise that I found myself working on a part of the model for which I had no firm plan. The back of the left arm featured the sculpted detail of three skulls, forming a Nurgle icon, set into a large open wound. Very gruesome and apparently straightforward, all I had to do was paint what was in front of me.


However, I had a nagging feeling that I needed to do something with this area other than just paint it as it is! The skulls are a great detail in their own right but were too distinctive a detail from the donor model (Great Unclean One) and in the new context seemed a little fiddly. Whenever I’ve had doubts or problems with this model I find the best solution is nearly always to be bold, so I decided to replace the skulls with something a bit more dynamic!

I chose to have a Nurgling popping out of the wound. I painted my Nurgling, stuck him in place and filled the surrounding wound with microbeads. As it turns out this was not a good choice because I had replaced one fiddly detail with another. In addition to that the microbeads looked very artificial. It was time to follow my own advice and be bolder! 


I scraped away the microbeads and prised the Nurgling off the model. Then I took my Dremel and ground away all the detail of the wound to make a deeper recess. This was nerve-wracking work, and it made a horrible mess, covering the area in tiny plastic flecks that were very difficult to clean off the painted surfaces. But no pain no gain!

I decided to see how the model looked with a tentacle hanging out of the wound. This was a much bolder element than the skulls or Nurglings and it also tied in to the other tentacles on the model. A quick test fitting confirmed that this was a move in the right direction but I decided to add two tentacles because that was a little more dynamic than just one. I pre-painted and varnished the tentacles before I pinned and glued them into place. Next I had to deal with the wound and microbeads. 


I’ve covered the use of microbeads on this blog before and you can find my tutorial HERE. However as time has passed I’ve gained more experience with my technique and materials.

I still recommend applying the microbeads one at a time as this gives far more control over the final look. If you fill or cover an area with a mass of microbeads in one go the finished result can be formless and bland. Taking care with their placement will enable you to ‘sculpt’ with the microbeads and create some form and structure to your effect.

In my experience water effects is the best medium to fix your microbeads in place and bind them together; but it can also be mixed with a range of differing materials to tint it. Of course quantities used can be varied to adjust the finish but the examples bellow show my favourites. 

Water effects finished with a coat of gloss varnish will give a crystal clear finish.

 
Tamiya clear colours will tint the water effects without lessening the transparency. 
 
 
A small amount of pigment powders will give a slightly cloudy and less translucent finish. 
 
 
Acrylic paint can create a more opaque effect. 
 

To varnish or not is a big question because it can radically alter the final result of any water effects. I use Vallejo Still Water which dries to a clear shiny finish but that may change over time. I’ve noticed that over the course of a few days the finish will become a little duller and eventually take on a matt/frosted look. This may be a result of my products being out of date but it has eventually happened in all cases where I’ve not varnished over my water effects! 


However all is not lost because I quite like the frosted/translucent look. It’s an interesting and useful variation on the effect and the frosting doesn’t occur if the water effects have been varnished once they are dried. Where the frosting occurred and was unwanted it was easy enough to fix. I think the frosting is caused by humidity so I take a hairdryer and apply a gentle stream of warm air to the model. The frosting will disappear and the clear gloss finish will return before your eyes - like magic! It is then possible to apply a couple of coats of gloss varnish for a permanent fix. My preferred varnish for high gloss effects is Tamiya clear X-22.

The final update to my use of microbeads and water effects came as a direct result of how they looked on my Daemon Engine. I’ve always intended to feature a quantity of slime and goo on my new model, as it was a prominent feature of the old one. I felt that the semi-opaque look and more muted colour I get from using pigment powders was the way to go because I didn’t want my slime to be too bright and ‘cartoony’. But as soon as I started adding water effects and microbeads to this model it looked very artificial and didn’t feel like a part of the whole.

The solution was to apply some subtle red glazes over the green slime once it was dry. I usually build up a stronger red in deeper areas and along the top edges of my slime. This has the effect of toning down the slime and blending it into the surrounding areas. Even when it has been glossed over the slime now feels like a part of the whole scheme.


Saturday 27 March 2021

Project P30 - Part 10

Painting skin tones in three (painfully complicated) steps!

 
Over the last few weeks I’ve established a good routine where I’m able to paint for a few hours every day and it feels like I’m making steady progress. There is still a lot to be resolved with regards to how I use my colour palette, but the more I get done the more developed my ideas become. I am especially happy with how well the flesh tones are coming together. 
 

When I started painting, I thought that my plans for the flesh tones had gone out of the window in favour of something similar to what I’ve done before. However, as I’ve explored my colour palette, and the surfaces involved in painting the flesh, things have become a bit more interesting for me. Although the flesh tones I’m painting are similar to those in earlier projects, I’ve been able to incorporate the pale tones and cool hues I intended. The result is a more complex and nuanced Nurgle flesh than I’ve painted before. 


Overall this is a very satisfying outcome. It’s keeping me challenged and interested during the painting process and the results feel appropriate to a model of this size and scope. I think a straightforward application of my Plaguebearer flesh tones would have looked far too basic on this model! 
 
This Nurgling was painted to give me a change of pace
and will be added to the Tank (along with others of it's kind) later on.
 
I’ve already shown the colour swatch from my notebook but lets now look at the actual palette I’m using for my flesh tones. 


Global Shadow colours.

Black Leather
Boreal Green

These two colours are used in all of the shadows. The exact proportions I use in the mix vary depending upon the values of hue, temperature, tone and saturation I want. Broadly speaking, the shadows tend to be cooler than the mid-tones and highlights. To adjust the nature of my shadow colours, Black Leather will warm things up and desaturate while the green will give a cooler but more saturated colour. Boreal Green is, like many blue and green hues, a very pigmented colour and should be used cautiously. A little bit of Boreal Green will go a very long way!

Global Highlight colours.


Flayed One Flesh
Purity White
 
Flayed One Flesh is currently my favourite highlight colour it makes for bright, warm highlights. When I want to push things a little further I use Purity White. It is a slightly translucent soft white that will not overpower a colour mix. I’ve found that, although I need a little white in my highlight mix, here and there, I need to be very sparing with its use.

Mid-tones.

Bugmans Glow 
Bering Blue
Sherwood Green
Blood Red
Sahara Yellow
Rakarth Flesh

There are quite a few colours in my mid-tone range but I am not necessarily using them all together at the same time. As with the shadows, I will vary things to adjust the values of the colour I want. I’ve found that pale flesh tones look very good if they contain elements of blue, red and yellow, so I’ve included these colours in my mid-tones. Green is there to introduce a Nurglish element and Sherwood Green is a favourite colour in my Nurgle schemes. It’s a yellow green that works very well in warmer flesh tones and compliments the cooler Boreal Green I’ve used in the shadows

Bering Blue is my blue of choice for flesh tones. It is a subtle desaturated hue that will not overpower other colours in a mix. I especially like using it to create cool reflections within my shadows, adding extra nuance to those areas. 


As well as serving as a base colour for my flesh tones, Rakarth Flesh is a useful addition to the mid-tones. It’s inclusion helps to unify all the colours into a convincing whole. It may not be obvious but there is nearly always a little Rakarth mixed in with my mid-tones.

As my title suggests painting the fleshtones on my Demon Engine is a complicated process! It involves a lot of going back and forth to adjust the values of my colours. One thing it most definitely isn’t is a regular step-by-step process. Naturally enough some areas are difficult to get right while others fall into place more easily; but the overall process can be loosely described as having three stages. It usually takes me between eight and twelve hours, spread over several painting sessions, to be satisfied with my work on a particular area.

The first stage is the most systematic as I block in the overall placement of my highlights and shadows. This will provide some structure to my painting. I will adjust the characteristics of my colours but the placement of highlight, mid-tone or shadow is fixed. In addition to the tonal values I will make initial decisions about the hue, saturation and temperature of my colours. 


It’s during the second painting session, having taken the time to sit back and study my work, when I will fine tune the colour values. I am considering the area I am working on and it’s relationship to the model as a whole, to influence my choices. This work is carried out with a succession of glazing, stippling and thin layers. It is a process of going back and forth between colour values, using different techniques, in no specific order. This is by far the longest (and potentially most frustrating) part of the process, if things don’t go well. I will also begin to consider and introduce texture. 


Once again I will take time to step back from painting and consider my next moves. Time spent thinking about painting is at least as important as time spent painting. Step three is where I will finesse my work. Any adjustments to the colour values are usually subtle and most changes will involve refining the textures and transitions. 


To be honest I’m thoroughly enjoying myself as I push all this paint around!