
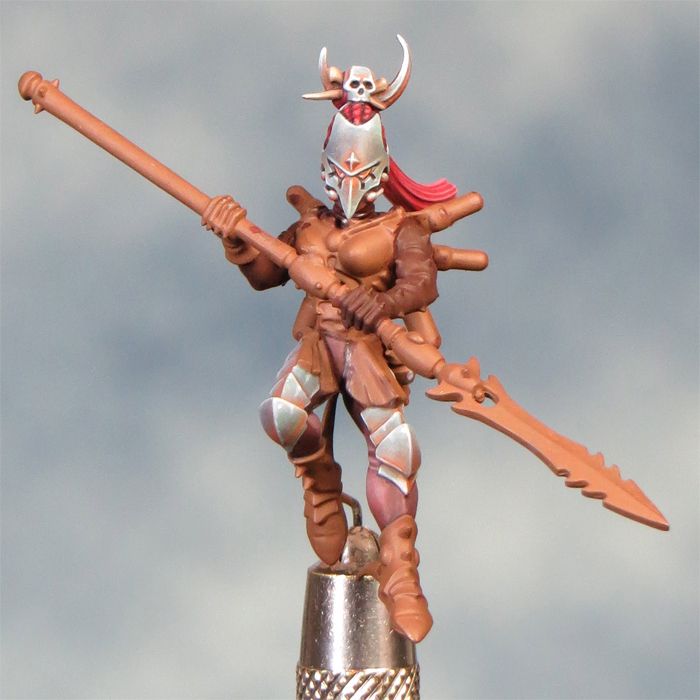
Before I could start on the armour I had to tackle the under suit and initially it looked as if my painting troubles were still be following me. Working up from a base of scorched brown I highlighted by adding an increasing amount of Rakarth Flesh. The colour was good but became a little too pale and slightly dusty looking. It was (I thought) a simple fix with a glaze/wash using some of the new Citadel shade colours. Unfortunately, unlike the old citadel washes, these colours dried on my mini with a shiny finish and looked horrible! That was unexpected and a major disappointment. I shall have to experiment with washes to find where I can get the best matt finish. Luckily I had saved a small amount of some of the old washes and was able to sort the problem.
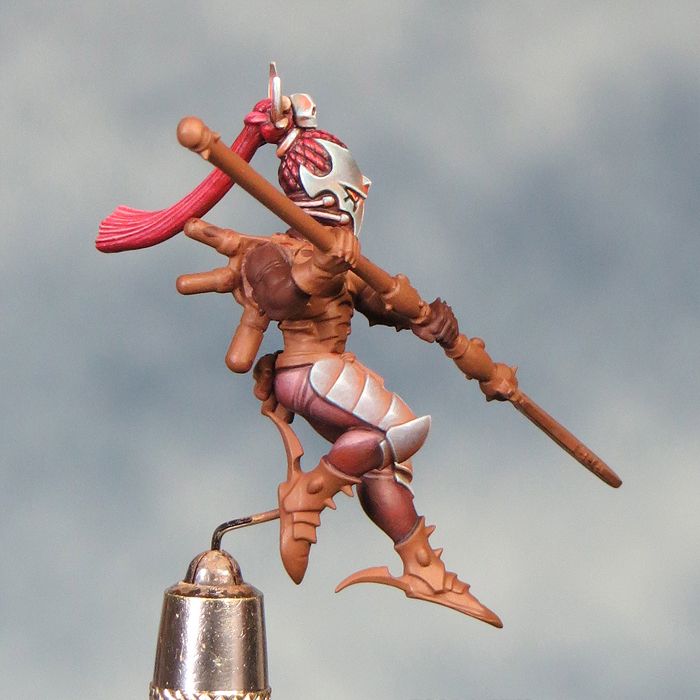
With the under suit painted I could begin painting the armour plates. The initial highlighting is fairly speedy, working up with increasing amounts of Adeptus Battlegrey added to the Calthan Brown base colour. This acts as a sort of underpainting for the blue,grey and orange tones that give the colour palette a more nuanced feel. This stage can be a fiddly business and requires a fair bit of going back and forth between colours and tones but it's worth the effort. After that it's a matter of keeping the highlights fine and sharp.
I used to have similar difficulties with the old GW inks. Once dry, they were glaringly shiny, which was entirely the wrong effect when used as a wash (the recesses were reflecting light... not entirely realistic!).
ReplyDeleteI tried fixing the problem with a shot of Testor's Dullcote (my preferred sealer), but the aerosol spray often didn't reach the recesses. Eventually, I tried applying Vallejo Matt Medium by brush as a matt sealer of sorts. Worked perfectly (although I sometimes needed to thin down the Matt Medium with a tiny bit of water).
Anyway, loving your work! Your models are so amazingly beautiful, I have to say that I'm scared to offer any advice to someone so far beyond my own skill level. That being said, I figure if I make more mistakes than you do, perhaps I've inadvertently discovered more fixes?
Hi Kelly and thanks. the Vallejo Matt Medium sounds like a really good fix for this problem. I'm gonna order some right away as I think it will be a really useful additive to my paints & washes.
ReplyDeleteLooking excellent so far. I have been pouring over your work on this project as I love seeing such clear WIP shots and explanations. One thing I want to ask is...it looks like you brush on your primer? Is this correct? I noticed in your Not-Dr-Who step-by-steps, the model had painted parts and bare metal, which you seemed to prime as you went along. Of course this is heresy and I shall have to report you immediately!! Seriously though, what are your reasons for doing this and how do you get your coverage a) so smooth and b) so even when using a brush? I know you are an advocate of the "thin paint and many layers" approach, so is this how you approach ALL of the painting for a model including primer?
ReplyDeleteRegarding the Vallejo Matt Medium, I'd second it's use, also their Glaze Medium too. Used in very small quantities, the GM extends the time your paint stays wet which has its uses. I read that wet blending isn't something that you do so much (if at all) but it still may be handy. Might even help with the washes issue too.
Keep up the great work you are doing and please continue with your WIPs, both here and over at PB; they are invaluable :)
Cheers, T
Hi Toosh, yes I always apply my primer with a brush.
ReplyDeleteThere are a couple of reasons why I do this.
1. I'm far better at using a brush then a spray primer. Over the years I've had a few spay related disasters and it's made me very cautious about spraying my base coats or varnishes.
2. I find that painting on the base coat this way gives me the chance to really study a mini closely and get to know all the tricky areas and plan out how I will approach painting the mini. You could say I use the base coat as a sort of dry run for the later stages.
As you've guessed getting a good finish is down to "thin paint and many layers". This is pretty much my philosophy for all stages of painting. It's very much a personal preference but in general the more time I take the happier I am with the results I get.
The Not-Dr-Who minis are a bit of a throw back to an earlier style of painting. I never used to apply an overall under coat but worked up each area as I came to it starting off with my base colour for that area. My reason for doing this was to keep the number of paint layers down. I no longer work this way as I've refined my technique using thinner layers of paint.
I've started using the Vallejo Matt Medium and it seems to be working out well.
Hi David many thanks for your response. Re the priming, do you still use a primer paint, i.e. smelly primer, or do you simply pick a base colour as an undercoat colour? Also how wet is your paint? I would expect the paint to not key to the model and go bobbly (sorry cant think of a better way to describe this!) due to surface tension of the added water. Is it merely the washing process you do before painting, or is your paint not as thin as I'm thinking it is? Sorry about all the questions, but I'm really interested in your approach to painting because you achieve such a perfect finish :)
ReplyDeleteHi Toosh, I pick a base colour and use that rather than a primer. I prefer to use citadel foundation/base colours for this as I really like the result I get with them.
ReplyDeleteFor the first coat I dilute just a little and apply as thin a layer as possible. I use a flat ended brush for this and really work the paint over the surface (not good for the brush but needs must). This first coat is nearly always very patchy looking but it gives a key for the later coats.
I dilute the paint a little more now and keep building up thin layers of paint until I think it looks good.
When you work with such thin & dilute layers of paint it's really important to let each layer get completely dry. The first few coats can lift off quite easily when you paint over them if you're not careful.
Great thanks for all your answers, sorry if it's felt a little like the Inquisition! Hopefully Peter (Avicenna) and I will bump into you at Salute and get to see this piece in the flesh :D
ReplyDeleteGlad to hear that the Vallejo matt medium's working out well. Does that mean I can claim credit for your impending Slayer Sword win? ;)
ReplyDeleteI called it!
DeleteI found that if you shake the wash pots for a while it stops them drying with a shiny finish.
ReplyDelete