

I’ve not really sculpted anything since I started painting minis again in 2010. But in the years immediately prior I’d begun to explore sculpting in some depth. In fact it was my venture into sculpting that led me back to mini painting. I got into customizing Dr Who Action Figures and rapidly became dissatisfied with simply chopping and swapping various parts. Over time I developed some limited sculpting skills and familiarized myself with the materials and techniques.


My venture into sculpting enabled me to make my own figures but as I was sculpting ‘action’ figures their poses were very stiff and static. The examples above show how far I had come and in time I might have further developed but one thing led to another and mini painting reclaimed my full attention.
So there I was having decided to resurrect my sculpting skills and feeling more than a little daunted. At that point it struck me that I really had nothing to lose. If it all went wrong I could bin it and start again and in the worst case I could explore the triple headed option. My inhibitions had been born of a fear of failure but I now felt perfectly happy to give it a go!
I now had to decide what I was going to sculpt the head out of. This decision is complicated for me as I’m very allergic to most epoxy putties. My three main options were:
Super Sculpey firm.
I ‘d gravitated towards this polymer clay as the default for my action figure sculpts. It remains workable until baked but, even then, it can be added to and re-baked. In addition, I’m not allergic to polymer clay.Milliput.
The great advantage of milliput is that once set it can be easily sanded, carved and drilled. It responds very well when mixed with water and can blend seamlessly with other materials. Unfortunately milliput triggers my allergy, and if it touches my bare skin, I will blister in a few hours.Greenstuff.
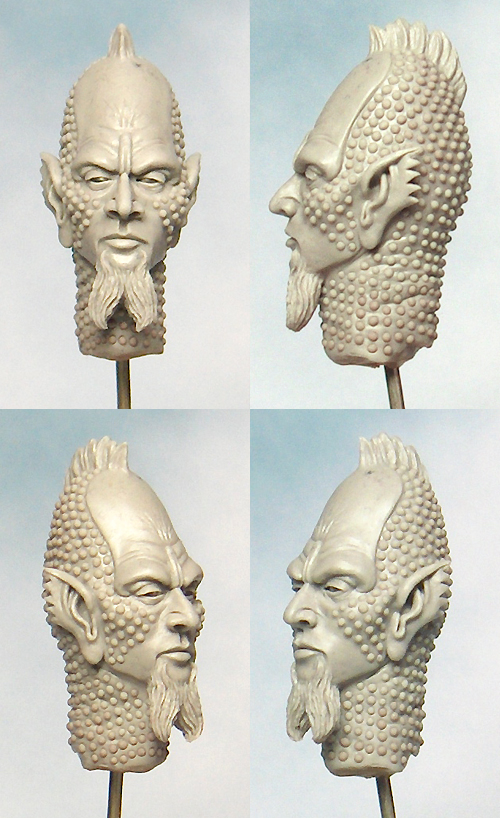
This is very soft and sticky when first mixed and as it sets it becomes firm but flexible. It never becomes totally hard and can be tricky to sand or carve. Greenstuff can also prove difficult to blend into other materials. If I handle greenstuff with due caution I suffer only minimal effects at worse.I would have liked to use Super Sculpey but because I would be incorporating elements from plastic kits into the head this ceased to be an option. Plastic kits and hot ovens do not mix! Therefore I decided to use Greenstuff to sculpt the head. Greenstuff has the added advantage of being good for creating soft fleshy textures and organic forms.
I’ve found it best to work in stages allowing each stage to firm up before I work on top of it. This prevents the problem of overworking the forms and flattening out the volumes. It also provides a stable surface to work on. There is nothing worse than perfecting one side of something only to find that you have also pushed out and distorted the opposite side!

To begin this process I needed an armature to support my sculpting. In this case the best armature for my head would be more than a little like a skull. This gave me a solid foundation to work on and provided an underlying structure for the muscles and flesh. The face was then built up in several stages incorporating the plastic elements as it developed.

At times I needed to sand the Greenstuff and this can be a problem. As it remains slightly soft and flexible Greenstuff can sometimes go rough, or even tear along its edges, when sanded. I’ve found that wet sanding almost always overcomes these problems. I use a waterproof (silicon carbide) sandpaper and gently work down from P320 to P2000. This also works well for sanding resin and plastic.


That's just amazing, the head looks perfect for the miniature.
ReplyDeleteGreat work :)
ReplyDeleteWould have loved to see more WIP pics between photo No.7 and No.8 but overall the series of pics is very informative. Thanks for sharing. :)
ReplyDeleteThank you for sharing the another art work of sculpture supply it's really amusing and great! Honestly, I got inspired. Thanks again.
ReplyDeleteGreat painting skill, Might I ask how you did the cover on the greens? Did you use lower pressure on your airbrush to get that effect?
ReplyDeleteReally awesome, looks great.Thanks for the post.Cheers!
Hi Joshua, at the moment nothing is painted so what you are seeing is greenstuff epoxy putty and grey plastic. When I do get round to painting I will use a brush and several light coats of GW's base paint to cover. I don't use an airbrush.
Delete