
The End is Nigh!
It will come as a great surprise to anyone if I state that a lot has happened since I last posted regularly on this blog! Not least the long anticipated return of Golden Demon UK at Warhammer World on October 1 & 2. I posted some finished pics here during the weekend of the competion but it’s time to indulge in a little time travel as I bring things up to date.
For some time my gut feeling was that I’d finish the Daemon Engine this year but there’s nothing like a deadline to boost momentum! I felt that, with some effort, the October deadline might be achievable so I decided to go for it. The last few months have seen some adrenaline fueled painting and I now feel more confident about that deadline. Things have been coming together well and the end is in sight!
As I move towards the closing stages of a project I usually create a checklist of things to do. This helps me to keep focused, stay on target and avoid missing anything out in a rush to get finished. It’s been especially useful this time around as there have been many steps to complete. In my next few posts I’ll describe that list of jobs in the order I did them.
Finish the mecha arm.
This arm has been the most physically difficult area of the model to paint so far! In retrospect, I wish I had found a way to paint the arm as a sub-assembly, which would have made things a lot easier.

However, the more interesting problem was to address the transitions between areas of flesh and metal. The arm came from the Forge Fiend kit and as such already depicted a union of monster and machine. This was a good starting point. I especially liked the hand as it matched the size of the fleshy hand holding the bell. However, some of the fleshy parts of the arm lacked the definition and texture that I wanted. I built up these areas with a combination of greenstuff, texture paste and microbeads. This had the additional benefit of helping to integrate the arm with the overall scheme by the use of common textures. This applied most especially to the bubbly/blistered texture I’d added elsewhere.
The next task was to address the stump out of which the mechanical arm protruded. Microbeads (of course) provided much of the texture, but I wanted something more. I wanted to create a semi liquid, ragged texture, as if the flesh was in the process of flowing into a new form. My greatest inspiration for this was the writing of Michael Moorcock, and most especially ‘Stormbringer’, which has had a huge influence on how I see the forces of Chaos and their effects. To create the flowing flesh, I used a variation of the cotton wool and water effects splash effect (shown HERE). In this case, however, I used a PVA glue and paint mix instead of water effects.
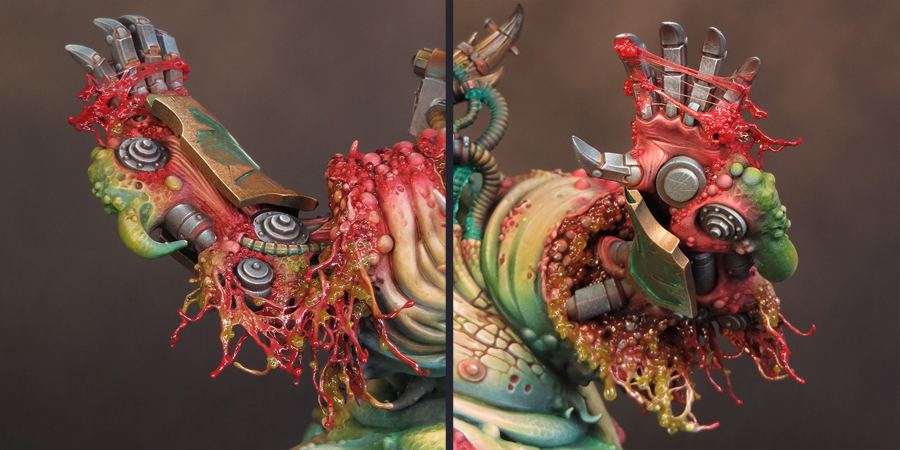
I was very pleased with the final effect but the overall look of the arm didn’t feel right to me. After some thought I decided that I needed more metal and machine parts in proportion to the fleshy parts. Taking my nerves in hand, I clipped off the large green tentacle (I was to later use it elsewhere) and added the spikey guard rail from the Plague Burst Crawler. It was a nasty job but I was much happier with the arm once it was done!

Paint the sides of the tank.
I regarded the sides of the tank as three distinct areas: the side panels, the tracks and the entropy cannon. The side panels are especially significant because it was here I wanted to create a major transition between flesh and metal.
I’d decided upon the colours for this transition as a part of my ongoing work. The fleshy parts of the side panels were to be a deep green, transitioning from the lighter green upper parts. I felt that a flashy NMM effect would be inappropriate for the metal parts. So I used a brown hue inspired by patinated bronze. This was the same treatment I’d used on the ‘boiler’ at the back of the tank. It is a colour that contrasts with the green but not in a way that draws the eye away from the focal points of the model.
The transition is created through the use of a freehand texture. This was based upon the painted texture of the upper flesh areas, so it felt like a part of the overall scheme. I’d not been looking forward to painting this transition but, by the time I came to do it, things had become fairly straightforward. All my choices had been made as an on-going part of the project’s evolution, so I was able to focus on executing them rather than worrying about what to do! All in all this was one of the faster parts of the paint scheme to complete.

Now I could paint the tracks. Once again my choices were informed by my earlier decisions. I kept the scheme for this area fairly simple. I painted the tracks and all the associated wheels, gears and general gubbins in the same dull grey NMM I’d used elsewhere. This would contrast with the adjacent parts of the model but fit in with the overall scheme. I had some plans for adding lots of mud and dirt but decided against this. As things have progressed, I’ve been editing my plans as it is easy to go OTT with this project. There is already a lot going on with the overall scheme.

Rather than adding heavy layers of dirt, I painted some fairly subtle rust effects and blended them into the brown shadows to give a grimy feel. My global shade colour is Black Leather from Scale Colour which helped with this a great deal. I am particularly fond of shading cool or neutral greys with brown hues. As always, the photographs I took for lighting reference were extremely useful when it came to placing my highlights and shadows!
The final job for this overall area was to paint the two entropy cannons. These were painted as sub-assemblies and provided a nice little sub-project.


The sides of the tank were the last significant areas of the tank to be painted.
The remaining work consists mostly of finishing things off and bringing together previously painted sub-assemblies.
Amazing. Great work!
ReplyDeleteThanks a lot for still writing on blogger :) Very interesting, as always!
ReplyDelete