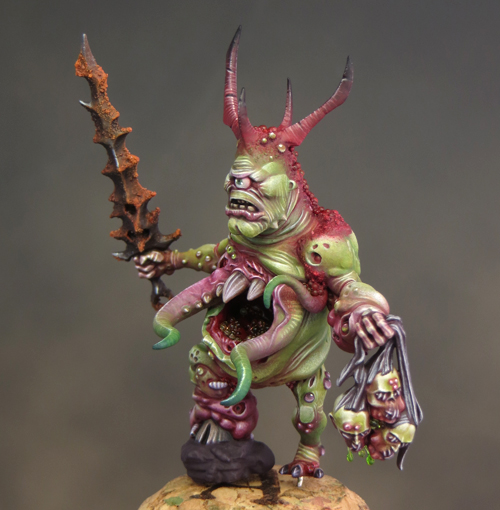
I had hoped to manage a quick pre-Golden Demon post to show the basing for my Plaguebearers. But the work didn’t go very smoothly and the week prior to the competition was just a little intense.
I’ll put together a proper write-up on how I finished off the Plaguebearers and my experience at Golden Demon 2016 later this week.
In the meantime, here is a belated reveal of the finished unit which I’m very proud to say took Gold in it’s category. I’m even more proud to say that Gutrot Spume also took Gold and then went on to win the 2016 Slayer Sword!
Sunday, 15 May 2016
Tuesday, 3 May 2016
Making Waves - Creating splash, wave and water effects for miniatures.
Before you start it is well worth searching the web for reference photos showing waves and splashes. I don’t recommend that you try and create a 100% perfect copy of any particular photo but good reference is invaluable in creating a realistic effect.
Materials
- Greenstuff (epoxy putty)
- Paints
- Clear plastic – e.g. blister pack plastic
Games Workshop Water Effects (fluid) - Vallejo water effects (gel)
- Crushed glass - a specialist basing material commonly used to create snow effects
- Micro balloons – a lightweight plastic powder used to bulk out resin
Invisible thread – a clear plastic thread used for clothing repairs
Clear glass microbeads - for nail art and craft projects
Step 1
I began by sculpting my wave shapes with green stuff. I found that a ball ended sculpting tool gave me the best results.
Step 2
Next you need to paint the waves. Think carefully about what sort of finished colour you want for your water. The colour of water can vary infinitely so pick something that will work with the overall colour palette you are using. Before you finalise your colour choice, it is worthwhile to test out how your colours look under a couple of layers of the water effects. The gloss finish will alter the final appearance of your colour.
For my waves I started off with a desaturated grey/blue tone and worked up to a brighter saturated blue/green. I then lightly dry brushed the tips of the waves with ivory. You could also use white for this but the ivory gave a pleasing greenish quality over the blue. If the dry brushing starts to build up a grainy texture that’s all for the better as this will add to the foam effect. You can glaze a little deep blue/green into the recesses to enrich the colour if you feel it is needed.
Step 3
Next it’s time to create the splash elements. I used melted clear plastic for this. This process is very random, so it’s a good idea to make lots and then pick the most suitable pieces.
I cut several long thin strips of the clear plastic and then held each one over a tea light until the plastic began to soften and melt. I gently pulled the plastic until it came apart. The softened/melted edges often form into interesting shapes that make great splash elements.
You will need to experiment with this technique as different plastics will react with varying results. Work in a well ventilated area and proceed with extreme caution! The combination of plastic and a naked flame is hazardous and all necessary safety precautions should be taken to avoid injury/accident.
Pick the splash elements you wish to use and trim them to size so they will fit. I used a blob of the Vallejo water effects gel to attach the splash elements to the base and then let everything dry thoroughly over night.
Step 4
The next step is to cover the entire surface of the water with the fluid water effects. The final result will be better if you build up several layers rather than one thick one. I found that four layers seemed about right for the look I wanted.
Water effects will shrink as it dries, so it’s important to allow each coat to dry before you apply the next. If you build up too thick a layer the shrinkage may cause some distortion to the splash and droplet elements.
Step 5
The base layer for the water is now done so its time to enhance the effect with some foam and droplets.
The foam is made from a mixture of crushed glass, micro balloons and fluid water effects. You can vary the proportions of the mix to create slightly different effects. Once again I would recommend a little experimentation to see what works for you.
As an alternative you could use baking soda to replace the crushed glass and/or micro balloons but you will need to be aware that baking soda can yellow over time and this would spoil the desired effect.
I applied the prepared mixture in places where the water would produce a foam and left it to dry. It’s wise to proceed cautiously and add a little at a time with a dabbing motion. You can also add a few clear glass microbeads to the foam mix in places where larger bubbles might form. The microbeads can also be applied randomly on the water.
Step 6
If you study freeze-frame photos of splashing water you will notice that many blobs and droplets are formed. First mix a few of the microbeads into a drop of the fluid water effects. Then put a small amount of the water effects onto the mini where you want to fix the microbeads. This will make it easier to push the microbeads around to get them into position. Pick the microbeads off your palette with a clean paintbrush and position then on the mini. Do this one at a time for more control.
To create the illusion of independent droplets of water breaking free of the splash you will need to use the invisible thread. Attach a short piece of the invisible thread to the splash with a dot of the water effects and allow it to dry in place. Now gradually build up a small blob of water effects on the end of the thread. This is a fiddly and time-consuming job but well worth the effort as it greatly enhances the splash effect.
Step 7
Once all the foam and splash effects are dried give them a couple of coats of water effects to tie everything together. At this stage you can build-up a few specific splashes and droplets with extra layers of water effects if you feel it’s needed.
Friday, 22 April 2016
Salute 2016
Last weekend saw my fourth trip up to London for Salute and to be honest it rather crept up on me! The main focus of my efforts for the last year and a half has been ‘Project Nurgle’ for the Golden Demons. I was a bit caught out by the announcement that the Golden Demons would fall in May this year. I had anticipated that the Demons would be held in the Autumn and had to adjust my plans.
I’d intended to paint a fantasy character miniature for Salute but doing that would have put a lot of pressure on the, now shorter, ‘Project Nurgle’ time scale. So I shifted all my attention to getting ready for the ‘Demons’.
I decided some time ago that I would hold Gutrot Spume back for a ‘grand debut’, alongside the Plaguebearers, at the Demons. That left me with a choice between Commodore Borgossa and Abalam for Salute.
There was much dithering on my part as only one entry is allowed per category but, with a little help from my painting friends, I decided it had to be Borgossa.
I entered Borgossa into the largescale category, which includes busts, and then spent the rest of the day browsing the stands and chatting. The chance to meet up with other painters is always one of the chief highlights of these events. As is usual for Salute the day went astonishingly quickly and, before I’d had time to get around all the stands, the competition results were announced!
Borgossa took the second place in his category! That rewarded my efforts over the last year to gain experience of painting larger scale minis and busts.
One of the judges was Peter Bell and he was kind enough to give me some useful feedback on Borgossa, which I hope I can incorporate into subsequent projects. In short, the overall paintjob on Borgossa was let down by the maroon jacket which didn’t match up to the texture work on the other areas.
It’s a bit of a relief that it was the jacket. I felt that there was something lacking but I’d not been able to pin down what the problem was!
Hindsight is all well and good but I need to sharpen my instincts, and hopefully, I will do so as I gain more experience painting larger scale pieces.
I’d intended to paint a fantasy character miniature for Salute but doing that would have put a lot of pressure on the, now shorter, ‘Project Nurgle’ time scale. So I shifted all my attention to getting ready for the ‘Demons’.
I decided some time ago that I would hold Gutrot Spume back for a ‘grand debut’, alongside the Plaguebearers, at the Demons. That left me with a choice between Commodore Borgossa and Abalam for Salute.
There was much dithering on my part as only one entry is allowed per category but, with a little help from my painting friends, I decided it had to be Borgossa.
I entered Borgossa into the largescale category, which includes busts, and then spent the rest of the day browsing the stands and chatting. The chance to meet up with other painters is always one of the chief highlights of these events. As is usual for Salute the day went astonishingly quickly and, before I’d had time to get around all the stands, the competition results were announced!
Borgossa took the second place in his category! That rewarded my efforts over the last year to gain experience of painting larger scale minis and busts.
One of the judges was Peter Bell and he was kind enough to give me some useful feedback on Borgossa, which I hope I can incorporate into subsequent projects. In short, the overall paintjob on Borgossa was let down by the maroon jacket which didn’t match up to the texture work on the other areas.
It’s a bit of a relief that it was the jacket. I felt that there was something lacking but I’d not been able to pin down what the problem was!
Hindsight is all well and good but I need to sharpen my instincts, and hopefully, I will do so as I gain more experience painting larger scale pieces.
Tuesday, 12 April 2016
Plaguebearers part 9
My first idea for the standard bearer was to use an ordinary Plaguebearer but, after a little consideration, I decided that I wanted the mini to stand out from the ‘regular’ troops. It felt appropriate to give the standard bearer stature, somewhere between a regular Plaguebearer and my champion. To achieve this I’ve based my conversion on a Herald of Nurgle miniature.
The conversion work was fairly straightforward. I swapped the head for that of a regular Plaguebearer and removed the branch-like growths from the spine. To be honest, I didn’t care for either the head or the growths and, in addition, felt that they would clash with the overall look of my unit. I’ve used a small piece from my ‘spare’ Gutrot Spume to form the basis of a hump on the standard bearer’s back. I like the pose of the Herald miniature and, in particular the pointing arm with it’s sagging, torn flesh. I’ve drilled a few extra holes into the sagging flesh on the arm to make it look even more ‘filigree’.
The most dramatic change is, of course, the replacement of the weapon with a standard. I decided on an icon of Nurgle for my standard and based it on the icon from the standard in the Putrid Blightkings kit. This was a good start but I wanted to create more impact, so I added the starburst crest from the Lord Relictor’s standard out of the Age of Sigmar Starter set – HERESY! The addition of a few nicks and dents helped to blend the starburst in.
With the conversion work done it was time to add a little texture by the addition of baking soda. Then the mini was ready for it’s base coat. This time I went back to using Rackarth flesh!
For the next stage I used glazes to build up the flesh tones and define the main blocks of colour. I also began to define the overall light and shade. Now I can work on refining the definition and detail.
The conversion work was fairly straightforward. I swapped the head for that of a regular Plaguebearer and removed the branch-like growths from the spine. To be honest, I didn’t care for either the head or the growths and, in addition, felt that they would clash with the overall look of my unit. I’ve used a small piece from my ‘spare’ Gutrot Spume to form the basis of a hump on the standard bearer’s back. I like the pose of the Herald miniature and, in particular the pointing arm with it’s sagging, torn flesh. I’ve drilled a few extra holes into the sagging flesh on the arm to make it look even more ‘filigree’.
The most dramatic change is, of course, the replacement of the weapon with a standard. I decided on an icon of Nurgle for my standard and based it on the icon from the standard in the Putrid Blightkings kit. This was a good start but I wanted to create more impact, so I added the starburst crest from the Lord Relictor’s standard out of the Age of Sigmar Starter set – HERESY! The addition of a few nicks and dents helped to blend the starburst in.
With the conversion work done it was time to add a little texture by the addition of baking soda. Then the mini was ready for it’s base coat. This time I went back to using Rackarth flesh!
For the next stage I used glazes to build up the flesh tones and define the main blocks of colour. I also began to define the overall light and shade. Now I can work on refining the definition and detail.
Sunday, 3 April 2016
Plaguebearers part 8 - Lesions, tentacles and boils … Oh my!
And there we have it, the Plaguebearer champion is finished! Once the severed heads were painted it was a matter of adding the finishing touches to pull everything together. In addition to a little dripping green slime, I added some blood dripping from a few of the wounds.
It’s very important to keep the blood drips as small as possible. This is mostly to ensure that they look ‘in scale’ but it also prevents them from becoming too cartoonish in appearance. To convey the impression that the slime is thicker than the blood, I’ve made those drips slightly larger. As always it’s all about creating contrasts!
I’ve used some microbeads to enhance the blood and slime but, further to that, I’ve used them to create additional areas of texture. This is most apparent on the back of the neck. The microbeads are mixed with a little tinted water effects, which gives a glossy finish. Once this has dried, I’ve then washed over the microbeads with diluted paint and ink. By doing this I am able to control the degree of gloss/satin/matt on the microbeads and better integrate them with the rest of the painted miniature.
I now have one miniature left to convert and paint for my unit, the standard bearer. But I’m also giving a lot of thought about the base for the finished unit. My recent bout of ill health may have some impact on this as my initial plans were to have the unit on a fairly elaborate scenic base. While I would still like to try this, I will need to see what time I have left once the standard bearer is complete and develop my plans appropriately. Past lessons learned also come to mind. A simple basing solution is not necessarily less effective than a complex one, and whatever I do, the miniatures must be the main focus!
It’s very important to keep the blood drips as small as possible. This is mostly to ensure that they look ‘in scale’ but it also prevents them from becoming too cartoonish in appearance. To convey the impression that the slime is thicker than the blood, I’ve made those drips slightly larger. As always it’s all about creating contrasts!
I’ve used some microbeads to enhance the blood and slime but, further to that, I’ve used them to create additional areas of texture. This is most apparent on the back of the neck. The microbeads are mixed with a little tinted water effects, which gives a glossy finish. Once this has dried, I’ve then washed over the microbeads with diluted paint and ink. By doing this I am able to control the degree of gloss/satin/matt on the microbeads and better integrate them with the rest of the painted miniature.
I now have one miniature left to convert and paint for my unit, the standard bearer. But I’m also giving a lot of thought about the base for the finished unit. My recent bout of ill health may have some impact on this as my initial plans were to have the unit on a fairly elaborate scenic base. While I would still like to try this, I will need to see what time I have left once the standard bearer is complete and develop my plans appropriately. Past lessons learned also come to mind. A simple basing solution is not necessarily less effective than a complex one, and whatever I do, the miniatures must be the main focus!
Subscribe to:
Posts (Atom)