
Monday, 8 April 2019

Monday, 11 March 2019
Sculpting a head for my Nurgle Demon Engine
As I said in my last post I toyed with the idea of using the heads from the plastic Great Unclean One on my new demon Engine. To be honest this was down to a lack of confidence in my sculpting abilities. A triple headed demon was not without some merit, but it was never going to be the solution for this project. Deep down I always knew I was going to have to sculpt a head if I wanted to stay true to the spirit of the 1990 tank! Trying out three heads also made it very clear to me that the new head needed to be much larger than those from the plastic kit. On my old tank the head was formed from the gun turret and I definitely wanted a new head of similar size and bulk.

I’ve not really sculpted anything since I started painting minis again in 2010. But in the years immediately prior I’d begun to explore sculpting in some depth. In fact it was my venture into sculpting that led me back to mini painting. I got into customizing Dr Who Action Figures and rapidly became dissatisfied with simply chopping and swapping various parts. Over time I developed some limited sculpting skills and familiarized myself with the materials and techniques.


My venture into sculpting enabled me to make my own figures but as I was sculpting ‘action’ figures their poses were very stiff and static. The examples above show how far I had come and in time I might have further developed but one thing led to another and mini painting reclaimed my full attention.
So there I was having decided to resurrect my sculpting skills and feeling more than a little daunted. At that point it struck me that I really had nothing to lose. If it all went wrong I could bin it and start again and in the worst case I could explore the triple headed option. My inhibitions had been born of a fear of failure but I now felt perfectly happy to give it a go!
I now had to decide what I was going to sculpt the head out of. This decision is complicated for me as I’m very allergic to most epoxy putties. My three main options were:
I would have liked to use Super Sculpey but because I would be incorporating elements from plastic kits into the head this ceased to be an option. Plastic kits and hot ovens do not mix! Therefore I decided to use Greenstuff to sculpt the head. Greenstuff has the added advantage of being good for creating soft fleshy textures and organic forms.
I’ve found it best to work in stages allowing each stage to firm up before I work on top of it. This prevents the problem of overworking the forms and flattening out the volumes. It also provides a stable surface to work on. There is nothing worse than perfecting one side of something only to find that you have also pushed out and distorted the opposite side!

To begin this process I needed an armature to support my sculpting. In this case the best armature for my head would be more than a little like a skull. This gave me a solid foundation to work on and provided an underlying structure for the muscles and flesh. The face was then built up in several stages incorporating the plastic elements as it developed.


At times I needed to sand the Greenstuff and this can be a problem. As it remains slightly soft and flexible Greenstuff can sometimes go rough, or even tear along its edges, when sanded. I’ve found that wet sanding almost always overcomes these problems. I use a waterproof (silicon carbide) sandpaper and gently work down from P320 to P2000. This also works well for sanding resin and plastic.


I’ve not really sculpted anything since I started painting minis again in 2010. But in the years immediately prior I’d begun to explore sculpting in some depth. In fact it was my venture into sculpting that led me back to mini painting. I got into customizing Dr Who Action Figures and rapidly became dissatisfied with simply chopping and swapping various parts. Over time I developed some limited sculpting skills and familiarized myself with the materials and techniques.
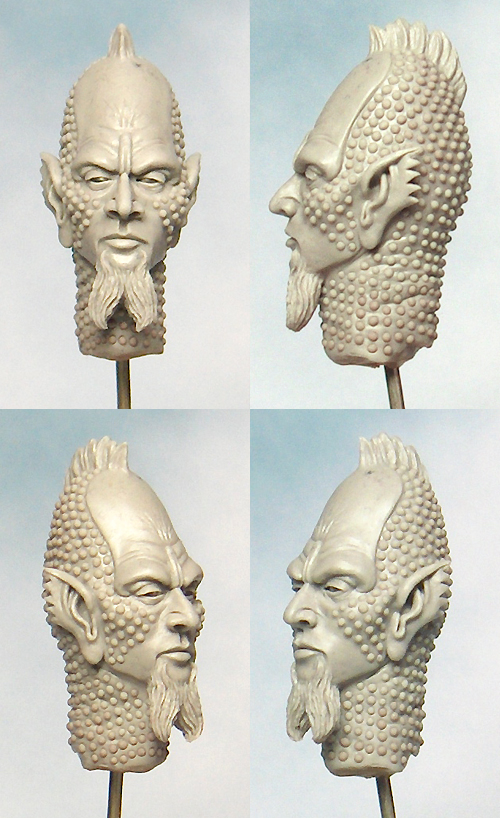


My venture into sculpting enabled me to make my own figures but as I was sculpting ‘action’ figures their poses were very stiff and static. The examples above show how far I had come and in time I might have further developed but one thing led to another and mini painting reclaimed my full attention.
So there I was having decided to resurrect my sculpting skills and feeling more than a little daunted. At that point it struck me that I really had nothing to lose. If it all went wrong I could bin it and start again and in the worst case I could explore the triple headed option. My inhibitions had been born of a fear of failure but I now felt perfectly happy to give it a go!
I now had to decide what I was going to sculpt the head out of. This decision is complicated for me as I’m very allergic to most epoxy putties. My three main options were:
Super Sculpey firm.
I ‘d gravitated towards this polymer clay as the default for my action figure sculpts. It remains workable until baked but, even then, it can be added to and re-baked. In addition, I’m not allergic to polymer clay.Milliput.
The great advantage of milliput is that once set it can be easily sanded, carved and drilled. It responds very well when mixed with water and can blend seamlessly with other materials. Unfortunately milliput triggers my allergy, and if it touches my bare skin, I will blister in a few hours.Greenstuff.
This is very soft and sticky when first mixed and as it sets it becomes firm but flexible. It never becomes totally hard and can be tricky to sand or carve. Greenstuff can also prove difficult to blend into other materials. If I handle greenstuff with due caution I suffer only minimal effects at worse.I would have liked to use Super Sculpey but because I would be incorporating elements from plastic kits into the head this ceased to be an option. Plastic kits and hot ovens do not mix! Therefore I decided to use Greenstuff to sculpt the head. Greenstuff has the added advantage of being good for creating soft fleshy textures and organic forms.
I’ve found it best to work in stages allowing each stage to firm up before I work on top of it. This prevents the problem of overworking the forms and flattening out the volumes. It also provides a stable surface to work on. There is nothing worse than perfecting one side of something only to find that you have also pushed out and distorted the opposite side!

To begin this process I needed an armature to support my sculpting. In this case the best armature for my head would be more than a little like a skull. This gave me a solid foundation to work on and provided an underlying structure for the muscles and flesh. The face was then built up in several stages incorporating the plastic elements as it developed.

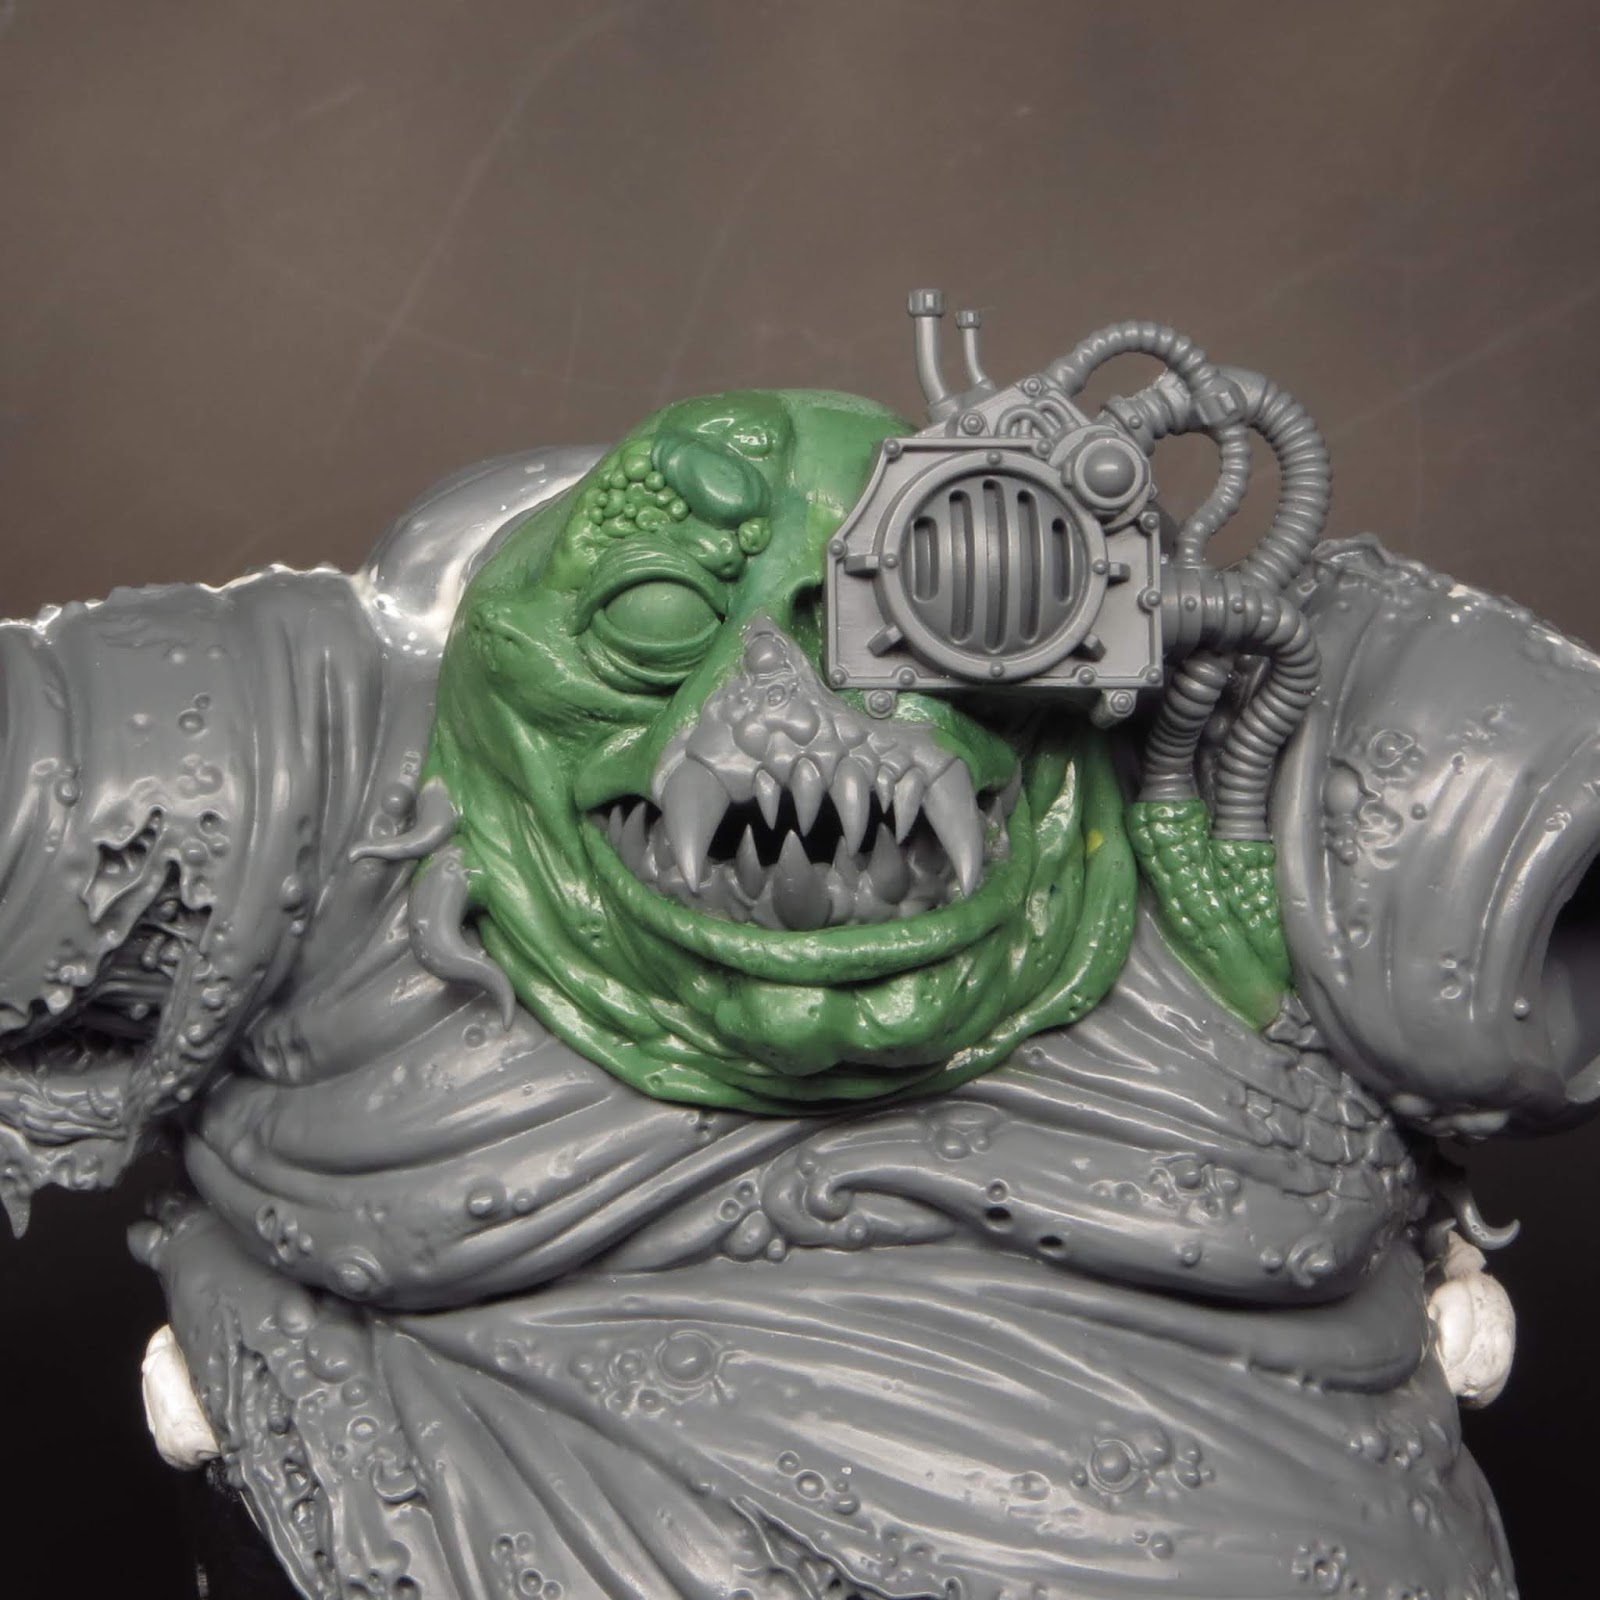
At times I needed to sand the Greenstuff and this can be a problem. As it remains slightly soft and flexible Greenstuff can sometimes go rough, or even tear along its edges, when sanded. I’ve found that wet sanding almost always overcomes these problems. I use a waterproof (silicon carbide) sandpaper and gently work down from P320 to P2000. This also works well for sanding resin and plastic.


Monday, 25 February 2019
Project P30 – Building a ‘better’ tank.
I first posted this project back in December 2017 and said it would be bubbling away in the background. Never was there a truer word as my updated predator has been constantly on my mind even if it wasn’t on my desk! I’ve been considering what kits to use and how to bring them together into one cohesive entity. This has been tricky because, although I had a concept and ‘feel’ for what I wanted to achieve, my ideas were very amorphous.
I needed to start tinkering with actual models in order to get the new tank out of my head and into physical reality. Once I started arranging the elements with adhesive putty, I’d be able to play with different concepts and compositions. The first step was to build the predator tank.
And there the project stalled! Something felt wrong and I couldn’t put my finger on what it was for some time. When I finally realised what wasn’t ‘doing it’ for me it was a bit of a shocker because I didn’t like the tank I was using!
I’d chosen the old style Predator Tank as a direct homage to my 1990 model. That seemed like an obvious choice but it felt unsuitable for what I wanted to achieve this time around. The old tank has a rigid boxy shape and my instincts were to use something more rounded and organic. For a long time I struggled and eventually realised that if I used the old style tank I would be fighting against it throughout the entire project.
I decided to let go of the old and embrace the new. This project was, after all, an updated version of an old concept and not a recreation. It took me a while, and a fair bit of agonizing, to make this choice but once I did it felt right. The new Tank I decided to use was the Death Guard Plagueburst Crawler. To be honest I’m appalled I ever considered anything else. It’s a Nurgle tank with a rounded form and organic details and if it had been around in 1990 I’d have used it then without hesitation. The new tank will take full advantage of the range of kits now available.

So the first big decision for Project P30 is that the new Predator isn’t a Predator after all!
Things then progressed at a slow but steady pace. I put the core of my tank together and then experimented with an assortment of extra kits. Straightaway I could see that the Plagueburst Crawler lent itself to the concept. It’s organic shape worked well in combination with the various ‘body parts’. I was now able to decide upon which exact parts I would be using for the major elements of the build. I’ve decided to use the torso from the plastic Great Unclean One as the basis for the torso of my demon engine. The arms will come, in part from the Chaos Maulerfiend but what about the head?
This has been one of the big questions I’ve had from the start. On the original tank I sculpted a face onto the Predator’s turret creating a head. With the new model I wanted a more fully emerged demon and that called for a distinct head and torso. I played with the head options from the Great Unclean One and considered having three heads. Three is, after all, a very nurglish number. But, although it had some possibilities, I felt it was a timid solution and not a true reimagining of the original.
I was pussy footing around the idea of sculpting a head from scratch. It’s been a few years since I’ve done any sculpting and the idea was pushing me way out of my comfort zone. There was only one solution I’d have to man up and break out the green stuff!
I needed to start tinkering with actual models in order to get the new tank out of my head and into physical reality. Once I started arranging the elements with adhesive putty, I’d be able to play with different concepts and compositions. The first step was to build the predator tank.
 |
| Although I won't be using this tank as I'd first imagined it will have a place in the project before all is done. |
I’d chosen the old style Predator Tank as a direct homage to my 1990 model. That seemed like an obvious choice but it felt unsuitable for what I wanted to achieve this time around. The old tank has a rigid boxy shape and my instincts were to use something more rounded and organic. For a long time I struggled and eventually realised that if I used the old style tank I would be fighting against it throughout the entire project.
I decided to let go of the old and embrace the new. This project was, after all, an updated version of an old concept and not a recreation. It took me a while, and a fair bit of agonizing, to make this choice but once I did it felt right. The new Tank I decided to use was the Death Guard Plagueburst Crawler. To be honest I’m appalled I ever considered anything else. It’s a Nurgle tank with a rounded form and organic details and if it had been around in 1990 I’d have used it then without hesitation. The new tank will take full advantage of the range of kits now available.

So the first big decision for Project P30 is that the new Predator isn’t a Predator after all!
Things then progressed at a slow but steady pace. I put the core of my tank together and then experimented with an assortment of extra kits. Straightaway I could see that the Plagueburst Crawler lent itself to the concept. It’s organic shape worked well in combination with the various ‘body parts’. I was now able to decide upon which exact parts I would be using for the major elements of the build. I’ve decided to use the torso from the plastic Great Unclean One as the basis for the torso of my demon engine. The arms will come, in part from the Chaos Maulerfiend but what about the head?
This has been one of the big questions I’ve had from the start. On the original tank I sculpted a face onto the Predator’s turret creating a head. With the new model I wanted a more fully emerged demon and that called for a distinct head and torso. I played with the head options from the Great Unclean One and considered having three heads. Three is, after all, a very nurglish number. But, although it had some possibilities, I felt it was a timid solution and not a true reimagining of the original.
 | |
| This mock-up could hardly be rougher but it's the first step in what feels like the right direction! |
I was pussy footing around the idea of sculpting a head from scratch. It’s been a few years since I’ve done any sculpting and the idea was pushing me way out of my comfort zone. There was only one solution I’d have to man up and break out the green stuff!
Monday, 4 February 2019
Sloppity Bilepiper Part 4
Apologies for the lack of regular post on this blog but with all my old routines gone my painting and posting is more than a little erratic. In truth I’ve decided to focus my hobby time on painting with social media and blogging taking a back seat for the time being. This is working out very nicely for me as I’m getting a little more painting time and, most importantly, I’m enjoying myself.
In my last post I had just about finished the Sloppity Bilepiper but I'd yet to paint his base. With the luxury of a little more time I’ve now done that and it feels so good to have completed a project. The process has been fairly intense as there was a lot of going back and forth to tweak some of the details.


As the Bilepipe, his nurgling companion and the base came together many of the tones, hues, textures and finishes were adjusted to balance out the overall composition. It was all a bit fiddly and in some places very subtle but it’s really helped to tie the elements together. It’s been a satisfying experience to finesse a project without any deadline pressure.

The base incorporates my first use of resin water effects for creating the puddle the Bilepiper is stepping in. Admittedly it’s a cautious use of resin but I wanted to start off with something straightforward before getting more adventurous. I can see myself doing more water bases in my future.

I’d initially intended to keep the slime and drips to a minimum but as the project developed I realised this was not the right mini for that approach. He is after all called a SLOPPITY Bilepiper and that suggests more than a little sloppyness. So out came the microbeads, UHU glue and plenty of gloss varnish. My Bilepiper is now appropriately sloppy and is pipes are oozing bile!


In contrast to the slime I wanted to add some rough textures for the mould and corrosion. In the past I would have used my old friend baking powder but I’ve finally found what seems to be a perfect replacement. Chinchilla bathing powder, a mixture of mineral sand and calcium powder, has the right texture and best of all takes and holds colour very well! Fingers crossed it will, unlike baking powder, be stable over the long term.


So there we have it, the finished Sloppity Bilepiper. I started this as a ‘quickie’ after Mark came home from hospital but, as usually happens, the project drew me in and I’ve invested a lot of time into it. But I think it’s been time well spent because I’m very happy with the finished result and painting the Bilepiper has helped me get into the swing of a new painting routine!
In my last post I had just about finished the Sloppity Bilepiper but I'd yet to paint his base. With the luxury of a little more time I’ve now done that and it feels so good to have completed a project. The process has been fairly intense as there was a lot of going back and forth to tweak some of the details.


As the Bilepipe, his nurgling companion and the base came together many of the tones, hues, textures and finishes were adjusted to balance out the overall composition. It was all a bit fiddly and in some places very subtle but it’s really helped to tie the elements together. It’s been a satisfying experience to finesse a project without any deadline pressure.

The base incorporates my first use of resin water effects for creating the puddle the Bilepiper is stepping in. Admittedly it’s a cautious use of resin but I wanted to start off with something straightforward before getting more adventurous. I can see myself doing more water bases in my future.

I’d initially intended to keep the slime and drips to a minimum but as the project developed I realised this was not the right mini for that approach. He is after all called a SLOPPITY Bilepiper and that suggests more than a little sloppyness. So out came the microbeads, UHU glue and plenty of gloss varnish. My Bilepiper is now appropriately sloppy and is pipes are oozing bile!


In contrast to the slime I wanted to add some rough textures for the mould and corrosion. In the past I would have used my old friend baking powder but I’ve finally found what seems to be a perfect replacement. Chinchilla bathing powder, a mixture of mineral sand and calcium powder, has the right texture and best of all takes and holds colour very well! Fingers crossed it will, unlike baking powder, be stable over the long term.


So there we have it, the finished Sloppity Bilepiper. I started this as a ‘quickie’ after Mark came home from hospital but, as usually happens, the project drew me in and I’ve invested a lot of time into it. But I think it’s been time well spent because I’m very happy with the finished result and painting the Bilepiper has helped me get into the swing of a new painting routine!
Saturday, 22 December 2018
Sloppity Bilepiper Part 3


I’ve finally painted all of the flesh tones on the Sloppity Bilepiper and that’s enabled me to move on to painting the marotter. In doing so I’ve resolved the over all colour scheme and balance. The marotter is painted in muted tones but it features the same yellow/purple contrast with a green spot colour as the rest of the mini. In particular it’s the blue/green of the verdigris that gives a pop to the overall scheme at the moment.
I’d considered dialing down the slime effects on this mini (shocking – I know!). But the clue is in his name; so as the paint job comes together I will need to build in more slime, drips and goo. I must make sure my Bilepiper is suitably sloppity.
There are a fair few details to tweak here and there. In the most part that’s because I started this project with a fairly lose idea of the overall scheme. In spite of that the mini is suddenly looking a lot closer to being finished!
Subscribe to:
Posts (Atom)