
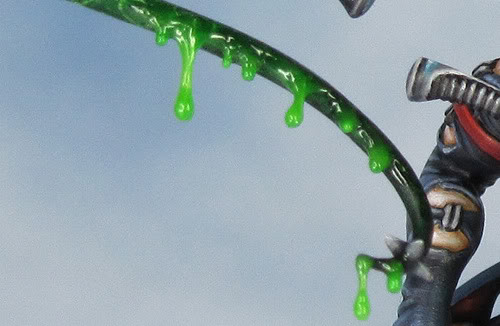
The method described bellow is the one I’ve used to add the drips of poison to my Hellion’s whip. There are many variations on the method and materials that can be used so this is very much my own take on things.
Step 1.
In order to get a nice long drip with a curve to it and a blob at the end their needs to be some kind of support/armature onto which the drip can be built. In theory you can build up the effect without one but it would take a lot more time and the final result might be quite fragile.
For my drips I used a hair to provide that support. There are other materials that could be used, for example very fine fishing line, but a hair is easy to get hold of and it’s a renewable resource. Tragically it just so happens that I now have a few white hairs in my beard so these were the obvious choice.
So first things first...ouch!

Step 2.
Glue the hairs in place. This is the really fiddly bit. On my Hellion I used clear glue and for the example here I’ve used super glue. On both the hairs had a tendency to shift position as the surface tension of the glue pulled them out of place. Use as little glue as possible and apply it with something fine like a pin. Let the glue get completely dry before you move onto the next stage.

Step 3.
Now you can start to build up the drips. To get things started off I’ve used clear glue. Squeeze a little out onto a piece of scrap paper and leave it to begin drying. Once it has started to thicken up it will be easier to get a blob to form on the hair. What you are aiming for if a coating of glue on the shaft of the hair and a little blob about to drip off the end. Apply the glue with a pin and once again leave it to dry. If possible support the model in a position that helps the blob of glue to dry on the very end of the hair.... get gravity to do the work for you.


Step 4.
This bit takes time, as the drip needs to be built up with multiple coatings. It is best to let each coating dry thoroughly before applying the next. They tend to shrink a little as they dry and if you rush thing you will have less control over the final result. For my drips I’ve used Games Workshop’s water effects tinted with a tiny dot of green paint. I’ve applied this with a fine brush giving each drip an even coat and then applying it more thickly where I want volume. As with the glue it is easier to get the thicker areas to build it if you let the water affects begin to set just a bit before you apply it.

Step 5.
Keep on building up the drips with successive coatings until you are happy with the result. As well as forming a blob on the end build up some thicker areas and a few small blobs and drips at the base.


If you don’t need your drips to be clear or translucent you could build them up with successive coats of paint alternatively you could use PVA woodworking glue. This is what I used to create the slime on my Nurgle Predator. I’ve also experimented with using Araldite Rapid epoxy glue but this needs to be done with extra care, as it’s hard to control and very permanent once set.
UPDATE: a few years have passed since I first used this technique, and I’ve added some refinements that have enhanced the finished effect. You can see them HERE
UPDATE: a few years have passed since I first used this technique, and I’ve added some refinements that have enhanced the finished effect. You can see them HERE
Useful Links:
The guys over at massive voodoo are a huge source of inspiration and ideas. The following articles were particularly useful to me with regards to finding out how to create drips and slime.
Thanks Dave. Love the photos and explanation. I plan to use this technique for most of my whips going forward. It really makes the model pop. Thanks again.
ReplyDeleteTim
I have experimented using your drip method and it worked very well. So far, I am on the stage where you build up the drip with glue. I haven't purchased GW water effects yet, but I don't see it being a problem. It already looks great.
ReplyDeleteDo you add this dripping effect after you have completely painted the model? It seems like it would be easiest to add the effects at the very end. Also seems like if you mess up the effect at the very end, it could be somewhat of a pain to remedy.
Thanks again for the tutorial.
Great to hear that you are using my 'drip method' and even better to hear that it's going well. I would always do this kind of detailing at a later stage if not at the very end of painting.
ReplyDeleteThe best way to lessen the chance of messing up is to take things very slowly. I let each layer dry and harden up over night. It takes time but the final result is better.
I have to say, this really is putting yourself into your work somewhat. Teasing aside, great technique. Couple of neat tricks on the site today :)
ReplyDeleteme like it!
ReplyDeleteAwesome tutorial - can´t wait to use it myself! Thanks.
ReplyDeleteIf you have a really small surface to do eg the jaws of a tyranid gaunt woodland sceneics water effects works well.
ReplyDelete