Showing posts with label greenstuff. Show all posts

Friday, 5 February 2021

Project P30 - Part 7


So here we are in 2021 and let’s all hope it’s a better year than 2020! For the last few months I’ve been very quiet with regards to painting sculpting and being online because I simply wasn’t ‘in the mood’. That’s not to say I was down or depressed but rather my energy and enthusiasm were directed elsewhere. I rediscovered my love for Lego and spent a lot of my time building a version of Hogwarts Castle to sit on the top shelf of my desk. I didn’t especially need a new hobby but lockdown seemed like a good time to start one. 


I chose a crazy time to put my tank onto the back burner because I was on the verge of completing the construction/sculpting phase. However, I think this pause proved to be an unexpectedly good thing because this was exactly the right time to stop and think. Not that I haven’t spent an awful lot of time thinking about this model already, but this was different. 


Up to this point my design for the tank had existed as an idea but not a completed three-dimensional object. But now I was able to have the entire model in my hands and, as a result, my plans began to evolve.

With the addition of the long awaited chimneys I finally had the overall composition fixed. This meant that I was able to consider all the elements of the model in context. I quickly decided to adjust the angle of the arm swinging the bell. By doing this I was able to raise the bell up. It was a relatively simple change but it opens up the overall composition and makes the pose look more active. After all, if your model is ringing a dirty great bell you want it to look like its giving it some welly! 


My idea had been to paint an updated version of my 1990 Nurgle Predator’s paint scheme. It would consist of a stippled green flesh tone with metallic details. However, I began to feel that this would not be enough. Regardless of how well I painted the model I think it would look very basic in the 1990 scheme.

Miniature painting has come a long way since 1990 and I need to reflect that in my new paint scheme. I want to create a scheme with more drama and contrast than the old one. The new scheme will reflect the range of materials and surfaces present on the model and most especially the transitions between machine and flesh. These areas will be treated differently in terms of colour and texture and the transitions between them should help to tell the story of a Demon engine manifesting itself as flesh.

The next step was to create an initial colour palette. Things will probably change as the project progresses but I need a starting point. The colours in my palette need to fulfil the following roles:
Base colour,
Shade,
Highlight,
Mid-tones,
Spot colours,
Nuance colours,
Metallic colours,
Neutrals.

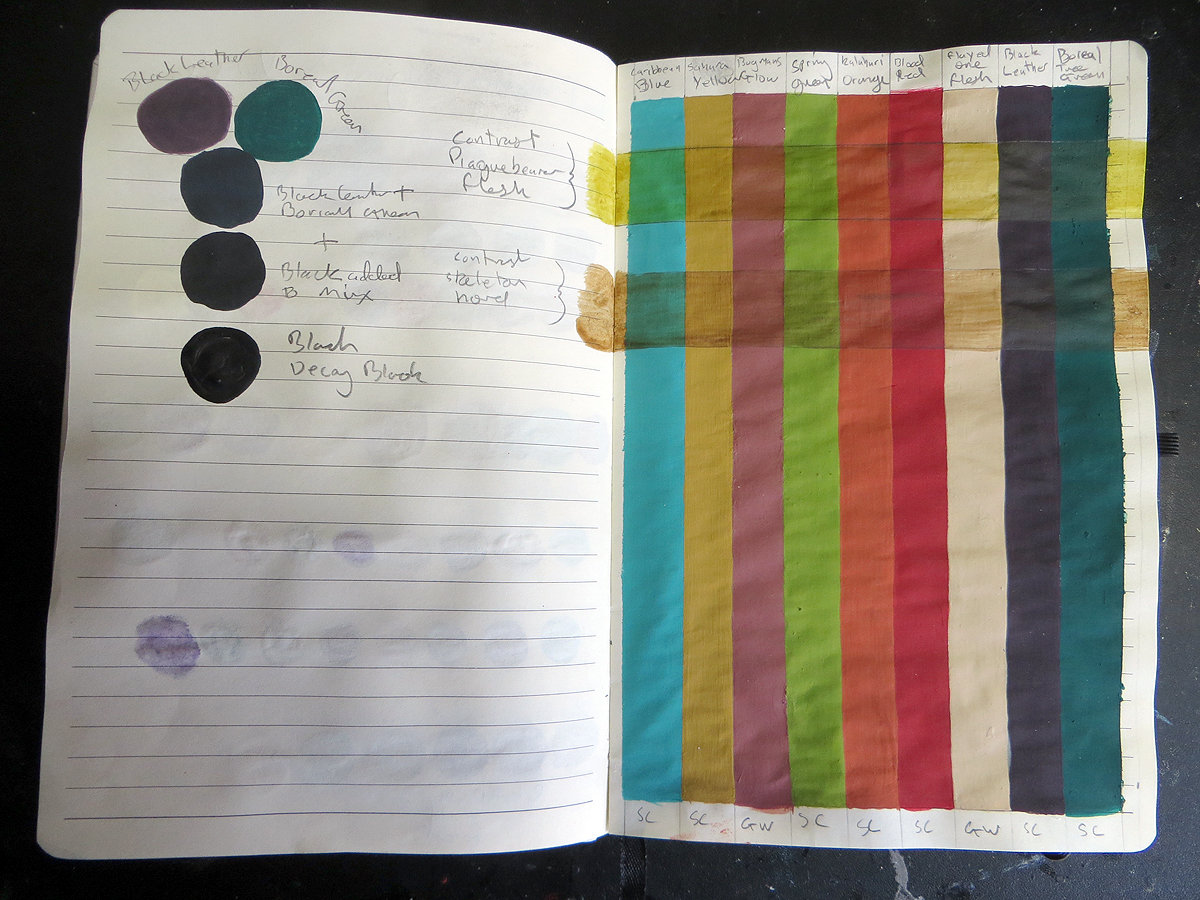
Bearing all of this in mind I began by lining up the colours I thought I might use. I then set about testing different combinations in my notebook. You can see my test swatches in the photo below. The first is at the bottom and they progress up the page. 


As you can see, it was during this process that I moved away from my mostly green 1990 colour palette. My new palette gradually became more varied and saturated as my ideas developed. I’ve decided to create a much paler flesh tone than I’d initially planned and graduate this into a dark (almost black) colour on the tank parts. I will also use a cooler palette of greens than I did on my old tank. The overall colour palette will have a lot more variety than my 1990 one but this is a large model and it can take it.

The next step was to paint a full-page colour swatch to see all my colours together. My initial reaction was to realize how similar this scheme looks to the one I used on Gutrot Spume. However this is a misleading impression. It doesn’t reflect the intended paint scheme in terms of the relative proportions of the colours or how the colours will mix together. Many of the subtler relationships between the colours will have to be resolved during painting. I think my colour selection will give me a good starting point to work from but it’s important to be flexible! 


My tank is now in the final stages of preparation for painting. I’ve photographed it for lighting reference. Washed it to remove any dust and grease, left over from its construction, and mounted it onto a painting handle. The final bit of preparation is to give it a light spraying of primer.

Then, finally, I will begin painting the tank! 


Tuesday, 6 October 2020

Project P30 - Part 6. Back to business.


It’s been just over a year since I last posted anything about my Nurgle Tank Project. I had, of course, no idea of just how turbulent and troubled that year was going to be and all my, and everybody else’s, plans were turned upside-down! However the Tank was not forgotten and the project was on hold while other things took priority. It’s been sat on my desk all that time and I’ve often given it some serous consideration. Not least while painting the Kastelan Robot because I can now confess that the focus on extreme dirt, damage and decay that I put into the Kastelan, was in preparation for painting my Tank.

But before I can get (finally) down to painting the Tank I have to finish building it. This involves resolving the back of the model and, although I had a vague notion that it would involve chimneys and an engine, I was uncertain of exactly how to proceed. In truth I was dithering!

The answer was to break out the blu tack and experiment with the parts I was considering. My initial option was to have two chimneys bursting out of the Tank’s back as shown below. I liked this very much but it didn’t feel quite right. 


I definitely wanted to use the chimneys but I also wanted to have a bit more of an engine element to the rear. My gut feeling was that, in addition to the chimneys, I wanted some sort of exhaust and something that looked like it might be a fuel tank or boiler. So I continued to experiment with a combination of elements some can be seen below.

The part I chose for this was a section from a dome in the Alchomite Stack kit. I’d considered this part right at the start of the project but thought it too big to use. Now, with more of the model constructed, I could see how it would perfectly match the existing curvature of the body I was building. But with this element selected the chimneys would now be far too big and bulky. The solution was to cut the chimneys down into smaller elements. 


The cut-down chimneys are, in my opinion, a better fit with the new back section. The two large chimneys have become three smaller ones and I prefer the asymmetrical arrangement, which creates a more interesting composition of the elements at the back of the model. Three is, of course, a very Nurgle friendly number!

With my choice finally made I got on with the job of putting everything together properly. To do this I had to cut away a large section of the back using my Dremmel. This was an unpleasant job and had to be done very carefully to avoid cutting away too much material. However, the cautious approach paid off because I managed to achieve a near perfect fit.

Rather than trying to create some sort of smooth transition between the flesh and the metal, I decided upon a bubbly molten sort of texture for the flesh where it’s engulfing the engine section. This matches other parts of the model and keeps to a consistent palette of textures.

 That’s where I’m now at with this model. The next step is to incorporate the chimneys and, although it’s likely to be a fiddly job, I’m looking forward to it. After a long hiatus Project P30 is rolling forward again!


Monday, 2 September 2019

Project P30 - Part 5


Every project has it’s steps and stages. Sometimes these are very obvious but at other times they may exist only in the mind of the artist. Either way they give a project structure and the feeling of progress. I’ve always worked this way myself because the habit of breaking a project down is, in my view, essential! In particular it helps when working on a large project, like my Tank, the scale of which could easily become off putting. Those thoughts of ‘this is getting nowhere’ can all too easily destroy momentum and enthusiasm, bringing everything to a grinding halt.

I thought it was time to show my Tank next to a roughly human sized
mini to give an idea of it's size. I hadn't realised what a beast it is!

I’m happy to say that such has not been the case with my Tank. I’ve set myself achievable goals by regarding this project as a series of distinct steps. That has given me a sense of progress and accomplishment, even though there is still very much more to do. That’s been invaluable because the most recent stage of development has been long and involved. I’ve had to keep on sculpting away in order to resolve the body and pose. It’s one thing to have an idea brewing away in your head but quite another to see it realised.


Although this part of the project could be divided into smaller steps, like the belly maw, I’ve had to stick at it to make sure all the parts work together. But, with the completion of the right arm, this overall stage is done! It now feels as if the bulk of the sculpting is accomplished and my initial concept is well on it’s way to being realised.

I recently discovered that, if I convert my pictures to black and white, the colour difference between the grey plastic and Greenstuff disappears. Tonally they are identical and it’s a great way to view my conversion and sculpting. With the distracting colour difference removed I can better judge my progress. 


I’m well aware that the last stage of the sculpting is likely to involve a lot of hard work. I need to resolve the back of the model and the union of the chimney/spine with the rest of the model. This is a key part of the concept as it’s an area that will feature a merger of biological and machine elements. But I’m very much looking forward to getting to grips with it as I have some ‘interesting’ ideas.

However I think it’s time to take a break from the Tank for just a few weeks. The project has reached a natural breaking point and I think It’s important to sit back, and take stock, before I move on to the next stage. That will also give me some time to get back to my Rockgut Troggoth in preparation for my upcoming Workshop in Nottingham. To tell the truth I’m looking forward to doing some painting after all that sculpting!

Sunday, 11 August 2019

Project P30 Building a ‘better’ tank - Part 4.

It isn’t easy being green!


July was a strange month with life in general being busier than it’s been for a long time. On top of all that the hot weather was not conducive to long hours of intensive sculpting. That might lead you to expect a declaration (or confession) that not much has happened with my tank but I’ve actually made slow steady progress.


The stop start nature of recent work has not been much of a problem because, when working with Greenstuff, I like to proceed in stages allowing each application to harden before I add another. I’ve found that sculpting a large mass can result in a squishy mess that resists my attempts to sculpt distinct forms and volumes. Greenstuff seems to work best when used in moderation over a firm foundation.

I’ve found it important to understand that Greenstuff changes in nature as it cures. When first mixed it’s very soft and sticky but over time it becomes firmer and less sticky. This means that, although hard to sculpt, when first mixed it will adhere to a surface very well. It is also soft enough to blend edges with the surface it has been stuck to. However, in order to sculpt Greenstuff with any sort of defenition, it has to begin the curing process. As the Greenstuff becomes firmer it becomes easier to create crisp forms and details.

Put simply using Greenstuff successfully is all about timing! Understanding that you can do different things with it at different stages of curing is vital. Otherwise you might as well try and sculpt with chewing gum!

I’m forever blowing bubbles!


With the teeth and cannon painted, and in place, I needed to sculpt the edges of the belly maw. I decided some time ago not to sculpt lips, and make a literal mouth, but rather to sculpt a ragged mutated wound in which the belly maw had formed. This seemed to be more in keeping with the asthetic of the current GW Nurgle range and appropriate to the model I was creating.
I wanted to create a blistered, bubbly texture and use this as a boundary between different areas on my Demon Engine and, most especially, on the edges of the belly maw. The bubbly texture is also partly inspired by the texture of microbeads and that seemed most appropriate for a Nurgle model of my own creation!

Creating the bubbles is a fairly straightforward two-stage process. First of all I roll out lots of balls of Greenstuff. It’s important to vary the sizes in order to give the bubbly texture an organic look. Then, while the greenstuff is still sticky, I place the balls into position and then leave them to harden. It’s easier to do control the overall look if you do this in several stages, allowing each stage to firm up before you apply the next.


Once the balls are fully hardened I push soft Greenstuff between them to fill the gaps and create a unified surface. Then I use a silicone tipped sculpting tool to work the greenstuff further into the gaps and smooth everything together. This last step is carried out as the Greenstuff becomes a little firmer and less sticky. Filling the gaps, to a greater or lesser degree, will create a more varied and interesting texture.


Over my shoulder


With the belly maw done I turned to the left shoulder and here I wanted to add a shoulder guard. This was built from a section of a plastic shot glass covered with a layer of soft and sticky Greenstuff. I sculpted the shoulder armour using a metal ball ended tool when the Greenstuff began to firm up. To stop my sculpting tools sticking I use a little water. Once the Greenstuff was set I cleaned up the edges with some wet sandpaper and fixed the armour piece into place using a blob of greenstuff. I then built up the shoulder to fill any unwanted gaps between it and the armour.


Crazy arms


The Daemon Engine is starting to come together and now looks more cohesive and complete. The only major parts left are the left arm and the chimneys growing out of it’s back. After a little consideration I decided to tackle the arm next so I have glued the mecha arm into place and begun work on the transition between the organic and mecha parts. Once again I’m using the bubbly texture and will combine this with lose tatters of hanging flesh.


My final pic for this post is just a quick snap but I know quite a few of you are curious to see my old and new Demon engines together: 30 years do make for quite a difference!